PythonのPyTestツールでユニットテストを行うには
ここではPythonのPyTestツールを使ってユニットテストを行う方法について解説します。
PyTestツールを使用すると、さまざまな条件を設定してPythonの関数を自動的にデバッグすることができます。
PyTestツールでPythonのデバッグ作業を飛躍的に向上させることができます。
ぜひ、積極的に活用してください。
この記事ではMicrosoftのVisual Studio Code(VS Code)を使用していますが、Jupyter NotebookなどのツールでもOKです。
説明文の左側に図の画像が表示されていますが縮小されています。
画像を拡大するにはマウスを画像上に移動してクリックします。
画像が拡大表示されます。拡大された画像を閉じるには右上の[X]をクリックします。
画像の任意の場所をクリックして閉じることもできます。
 図A:
図A:
 図B:
図B:
 図C:
図C:
 図D:
図D:
 図E:
図E:
PythonのPyTestツールでユニットテストを行うには
-
Pythonで任意の数値を自乗する関数「square()」を作成する
Visual Studio Code (VS Code)を起動したら新規フォルダ「unit_tests」を作成します。
次にフォルダ「unit_tests」に新規ファイルを作成して行1-9を入力(コピペ)します。
行1-3では関数「main()」を定義しています。
この関数では数値を入力させて関数「square()」を呼び出して結果を表示します。
行5-6では関数「square()」を定義しています。
この関数では引数で指定した数値を自乗して結果を返します。
行6では意図的にバグを組み込んでいます。本来「return n * n」とすべきです。
行8-9では関数「main()」を呼び出しています。
関数「main()」はこのプログラムを直接実行したときのみ呼び出されます。
つまり、他のプログラムから「from calculator import square」で取り込まれたときは「main()」は実行されません。
unit_tests/calculator.py:
def main():
    x = int(input("What's x? "))
    print(f"x({x}) squared is", square(x))

def square(n):
    return n + n    # bug => n * n

if __name__ == '__main__':
    main()
 図1
図1は実行結果です。
数値「2」の自乗は「4」ですから正常に動作しているように見えますがバグがあります。
図1
図1は実行結果です。
数値「2」の自乗は「4」ですから正常に動作しているように見えますがバグがあります。
-
Pythonの関数「square()」をユニットテストする【1】
VS Codeからフォルダ「unit_tests」に新規ファイルを作成して行1-13を入力します。
このプログラムでは、前出の関数「square(n)」が正常に動作するかユニットテスト(デバッグ)します。
行7-8では関数「square(2)」を呼び出して結果が「4」以外ならエラーを表示します。
同様に行9-10では関数「square(3)」を呼び出して結果が「9」以外ならエラーを表示します。
unit_tests/test_calculator_0.py:
from calculator import square

def main():
    test_square()

def test_square():
    if square(2) != 4:
        print("2 squared was not 4")
    if square(3) != 9:
        print("3 squared was not 9")

if __name__ == '__main__':
    main()
 図2
図2は実行結果です。
「square(2)」は正常に動作していますが、「square(3)」でエラーが発生しています。
原因は、前出で説明したように意図的にバグを組み込んでいるからです。
本来、数値を「自乗」すべきなのに「加算」しています。
図2
図2は実行結果です。
「square(2)」は正常に動作していますが、「square(3)」でエラーが発生しています。
原因は、前出で説明したように意図的にバグを組み込んでいるからです。
本来、数値を「自乗」すべきなのに「加算」しています。
-
Pythonの関数「square()」をassertを使ってユニットテストする【2】
VS Codeからフォルダ「unit_tests」に新規ファイルを作成して行1-11を入力します。
ここでは前出のプログラムを改善しています。
行7-8では「if」の代わりに「assert」を使用して「square(n)」の結果をチェックしています。
ちなみに、「assert」で結果が不一致のときは「AssertionError」が発生します。
unit_tests/test_calculator_1.py:
from calculator import square

def main():
    test_square()

def test_square():
    assert square(2) == 4
    assert square(3) == 9   # AssertionError

if __name__ == '__main__':
    main()
 図3
図3は実行結果です。
行11(図3)の「assert square(3)」で「AssertionError」が発生しています。
つまり、結果が不一致なのでバグがあるということになります。
図3
図3は実行結果です。
行11(図3)の「assert square(3)」で「AssertionError」が発生しています。
つまり、結果が不一致なのでバグがあるということになります。
-
Pythonのtry...exceptで「AsserionError」を拾ってログを表示する
VS Codeからフォルダ「unit_tests」に新規ファイルを作成して行1-37を入力します。
ここでは、「try...except」で「AssertionError」を拾ってエラーメッセージを表示しています。
なお、ここでは「print()」の代わりにloggingを使用してログを表示してします。
loggingの詳しい使い方は「記事(Article103)」で解説しています。
行4-7では関数「main()」を定義しています。
行5ではloggingのbasicConfig()メソッドでログのフォーマットを設定しています。
ここでは「levelname」+「message」をログとして表示します。
行7では関数「test_square()」を呼び出しています。
行9-34では関数「test_square()」を定義しています。
この関数ではさまざまな条件で関数「square()」をテストしています。
「assert」が一致したときは「:INFO:」のログを表示します。
「assert」が不一致(バグ)のときは「:ERROR:」のログを表示します。
ちなみに、「:ERROR:」のログのみ表示したいときは行5をコメントにして行6のコメントを外します。
つまり、basicConfig()の引数「level=」に「logging.ERROR」を設定します。
unit_tests/test_calculator_2.py:
import logging
from calculator import square

def main():
    logging.basicConfig(format=':%(levelname)s: %(message)s', level=logging.INFO)
    # logging.basicConfig(format=':%(levelname)s: %(message)s', level=logging.ERROR)
    test_square()

def test_square():
    try:
        assert square(2) == 4
        logging.info("2 squared was 4")
    except AssertionError:
        logging.error("2 squared was not 4")
    try:
        assert square(3) == 9   # AssertionError
        logging.info("3 squared was 9")
    except AssertionError:
        logging.error("3 squared was not 9")
    try:
        assert square(-2) == 4  # AssertionError
        logging.info("-2 squared was 4")
    except AssertionError:
        logging.error("-2 squared was not 4")
    try:
        assert square(-3) == 9  # AssertionError
        logging.info("-3 squared was 9")
    except AssertionError:
        logging.error("-3 squared was not 9")
    try:
        assert square(0) == 0  # AssertionError
        logging.info("0 squared was 0")
    except AssertionError:
        logging.error("0 squared was not 0")

if __name__ == '__main__':
    main()
 図4
図4は実行結果です。
「assert square(3)、square(-2)、square(-3)」で「AssertionERROR」が発生しています。
つまり、これらの条件のときに関数「square()」にバグがあるということです。
図4
図4は実行結果です。
「assert square(3)、square(-2)、square(-3)」で「AssertionERROR」が発生しています。
つまり、これらの条件のときに関数「square()」にバグがあるということです。
-
PyTestツールを使用してユニットテストを行う【1】
VS Codeからフォルダ「unit_tests」に新規ファイルを作成して行1-8を入力します。
ここでは前出のプログラムを「PyTest」ツール用に修正しています。
ちなみに、「PyTest」ツールを使用するときは「try...except」で「AssertionError」を拾う必要がありません。
unit_tests/test_calculator_3.py:
from calculator import square

def test_square():
    assert square(2) == 4
    assert square(3) == 9
    assert square(-2) == 4
    assert square(-3) == 9
    assert square(0) == 0
 図5-1
「PyTest」をまだインストールしていないときは、VS Codeの「TERMINAL」ウィンドウから「pip install pytest」を入力して実行します。
ここでは既にインストールしているので「Requirement already satisfied...」が表示されています。
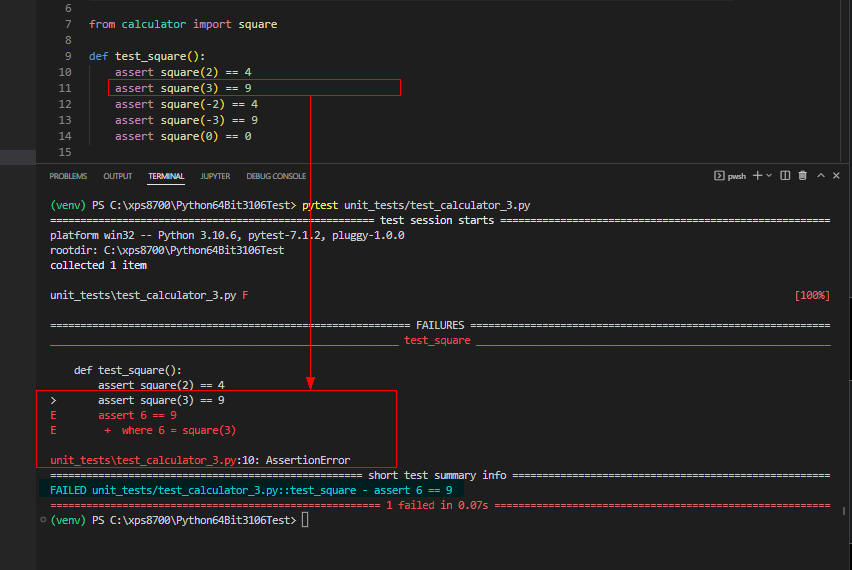 図5-2
「pytest」を実行するには、VS Codeの「TERMINAL」ウィンドウから「pytest」を入力して実行します。
「pytest」のパラメータ(引数)には実行するプログラムのパス名を指定します。
ここでは「pytest unit_tests/test_calculator_3.py」を入力して実行しています。
行11(図5-2)で「AssertionError」を検出したのでテストが途中で終了しています。
-
PyTestツールを使用してユニットテストを行う【2】
VS Codeからフォルダ「unit_tests」に新規ファイルを作成して行1-12を入力します。
ここでは前出のプログラムを修正して途中でエラーが発生してもテストを続行するように改善しています。
行3-5では関数「test_positive()」を定義しています。
ここでは「square()」の引数が正(Positive)の条件のみテストしています。
行7-9の関数「test_negative()」では「square()」の引数が負(Negative)の条件のみテストしています。
行11-12の関数「test_zero()」では「square()」の引数がゼロ(0)の条件のみテストしています。
unit_tests/test_calculator_4.py:
from calculator import square

def test_positive():
    assert square(2) == 4
    assert square(3) == 9

def test_negative():
    assert square(-2) == 4
    assert square(-3) == 9

def test_zero():
    assert square(0) == 0
 図6
図6は実行結果です。
「assert square(3), square(-2)」でAssertionErrorが発生しています。
「short test summary info」に「2 failed, 1 passed」が表示されています。
これは、関数「test_positive(), test_nagative()」でAssertionErrorが発生して、
関数「test_zero()」ではAssertionErrorが発生していないという意味です。
図6
図6は実行結果です。
「assert square(3), square(-2)」でAssertionErrorが発生しています。
「short test summary info」に「2 failed, 1 passed」が表示されています。
これは、関数「test_positive(), test_nagative()」でAssertionErrorが発生して、
関数「test_zero()」ではAssertionErrorが発生していないという意味です。
-
PyTestツールを使用してユニットテストを行う【3】
VS Codeからフォルダ「unit_tests」に新規ファイルを作成して行1-17を入力します。
ここでは前出のプログラムに行15-17の関数「test_str()」を追加して「square()」にstr型の引数を指定した場合のテストも行っています。
行1ではPythonのライブラリ「pytest」を取り込んでいます。
行16-17では、pytestのraises()メソッドで「TypeError」をテストしています。
つまり、「square()」の引数にstr型のデータを渡したときに「TypeError」が発生することをテストしています。
なお、今回のテストでは関数「square()」に意図的に組み込んだバグを修正しています。
「return n + n」を「return n * n」に修正しています。
ちなみに「return "dog" * "dog"」を実行すると「TypeError」になります。
unit_tests/test_calculator_5.py:
import pytest
from calculator import square

def test_positive():
    assert square(2) == 4
    assert square(3) == 9

def test_negative():
    assert square(-2) == 4
    assert square(-3) == 9

def test_zero():
    assert square(0) == 0

def test_str():
    with pytest.raises(TypeError):
        square('dog')
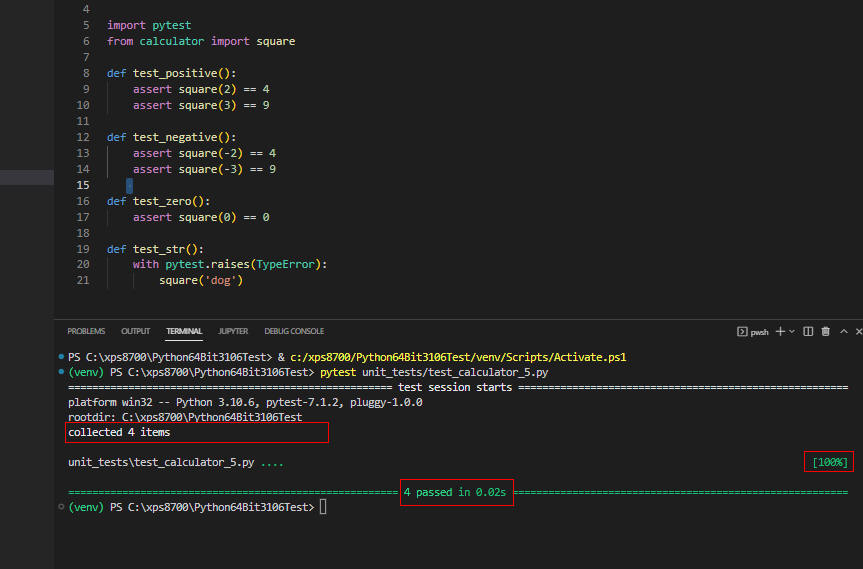
 図7
図7は実行結果です。
全てのテスト「test_positive(), test_nagative(), test_zero(), test_str()」が正常に終了しています。
これで関数「square()」のユニットテストが完了しました。
図7
図7は実行結果です。
全てのテスト「test_positive(), test_nagative(), test_zero(), test_str()」が正常に終了しています。
これで関数「square()」のユニットテストが完了しました。
-
PyTestツールを使用してユニットテストを行う【4】
VS Codeからフォルダ「unit_tests」に新規ファイルを作成して行1-10を入力します。
行1-4では関数「main()」を定義しています。
この関数では名前を入力させて関数「hello()」を呼び出します。
行6-7では関数「hello()」を定義しています。
この関数では「Hello,」に名前を付加して戻り値として返します。
たとえば、「hello('Akio')」のように呼び出したときは「Hello, Akio」が戻り値として返されます。
unit_tests/hello.py:
def main():
    name = input("What's your name? ")
    # hello(name)
    print(hello(name))

def hello(to="World!"):
    return f"Hello, {to}"

if __name__ == '__main__':
    main()
VS Codeからフォルダ「unit_tests」に新規ファイルを作成して行1-5を入力します。
ここでは、前出の関数「hello()」をテストします。
行4ではassertで「hello("Akio")」の戻り値をテストしています。
行5ではassertで「hello()」の引数を省略したときの戻り値をテストしています。
unit_tests/test_hello_0.py:
from hello import hello

def test_hello():
    assert hello("Akio") == "Hello, Akio"
    assert hello() == "Hello, World!"
VS Codeからフォルダ「unit_tests」に新規ファイルを作成して行1-11を入力します。
ここでは、前出のテストプログラムを改善して複数のテスト「test_default(), test_argument(), test_argument_list()」に分割しています。
このようにテストを分割すると途中で「AssertionError」が発生しても処理を継続させることができます。
unit_tests/test_hello_1.py
from hello import hello

def test_default():
    assert hello() == "Hello, World!"

def test_argument():
    assert hello("Akio") == "Hello, Akio"

def test_argument_list():
    for name in ['Akio', 'Taro', 'Hanako']:
        assert hello(name) == f"Hello, {name}"
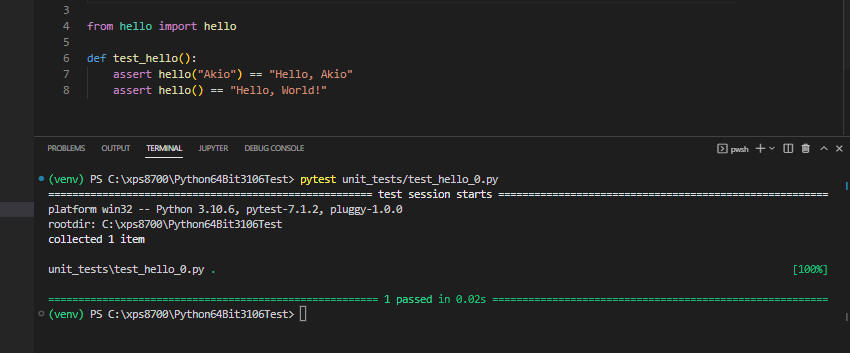 図8-1
図8-1は「test_hello_0.py」の実行結果です。
「1 passed」が表示されているのでテストが正常に終了しています。
図8-1
図8-1は「test_hello_0.py」の実行結果です。
「1 passed」が表示されているのでテストが正常に終了しています。
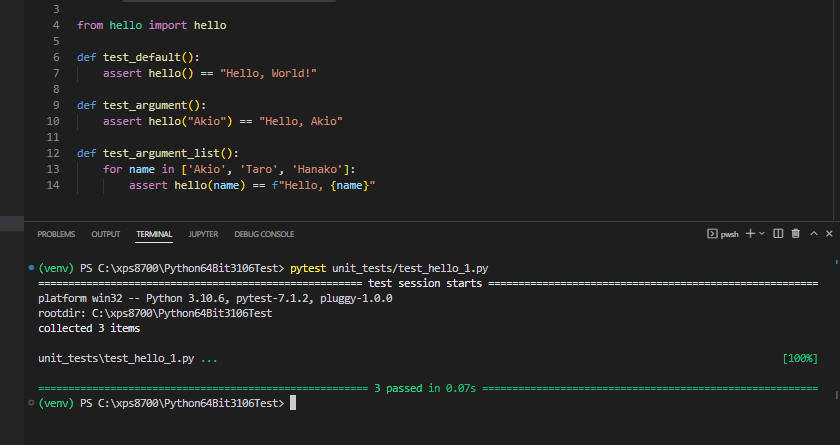
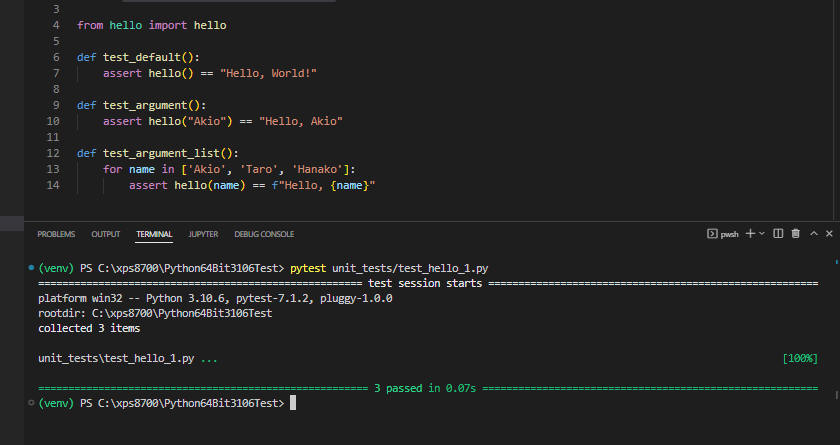 図8-2
図8-2は「test_hello_1.py」の実行結果です。
「3 passed」が表示されているので3種類のテストが正常に終了しています。
図8-2
図8-2は「test_hello_1.py」の実行結果です。
「3 passed」が表示されているので3種類のテストが正常に終了しています。
-
PyTestツールを使用してユニットテストを行う【5】
ここでは「PyTest」ツールで複数のテストプログラムを自動的に実行させます。
複数のテストプログラムを実行させるには、まずサブフォルダ「test」を作成します。
そしてこのサブフォルダ「test」にPythonの空のファイル「__init__.py」を作成します。
unit_tests/test/__init__py:
...Empty File...
次に、Pythonのテストプログラムを「test」フォルダにコピーします。
ここでは「test_calculator.py」をコピーします。
このプログラムは関数「square()」をテストします。
unit_tests/test/test_calculator.py:
from calculator import square

def test_positive():
    assert square(2) == 4
    assert square(3) == 9

def test_negative():
    assert square(-2) == 4
    assert square(-3) == 9

def test_zero():
    assert square(0) == 0
さらに、Pythonのテストプログラム「test_hello.oy」を「test」フォルダにコピーします。
このプログラムは関数「hello()」をテストします。
unit_tests/test/test_hello.py:
from hello import hello

def test_default():
    assert hello() == "Hello, World!"

def test_argument():
    assert hello("Akio") == "Hello, Akio"
    assert hello("Kasai Akio") == "Hello, Kasai Akio"
 図9
図9は実行結果です。
サブフォルダ「test」の全てのテストプログラムを実行させるには「pytest」のパラメータ(引数)にサブフォルダ名を指定します。
ここでは「pytest unit_tests/test」を指定しています。
ディレクトリの構成は図9の左側をご覧ください。
「5 passed」が表示されているので5件全てのテストが正常に終了したことになります。
図9
図9は実行結果です。
サブフォルダ「test」の全てのテストプログラムを実行させるには「pytest」のパラメータ(引数)にサブフォルダ名を指定します。
ここでは「pytest unit_tests/test」を指定しています。
ディレクトリの構成は図9の左側をご覧ください。
「5 passed」が表示されているので5件全てのテストが正常に終了したことになります。