ここでは、Dash(※)のWebページをスマホ、タブレット、ディスクトップパソコンで表示するときにレイアウトを変える方法を解説します。
この記事の前半では、「top, bottom」のカラムをスマホには上下に「top, bottom」の順に表示させます。
タブレット、ディスクトップパソコンには2段組にします。 左側には「bottom」、右側には「 top」を表示させます。
この記事の後半では、「top, middle, bottom」のカラムをスマホには、上下に「top, middle, bottom」の順に表示させます。
そして、タブレット、ディスクトップパソコンには2段組みにします。左側には「top, bottom」、右側には「middle」を表示させます。
  mobile
  +--------+
  | top    |
  |--------|
  | bottom |
  +--------+

  tablet/desktop
  +--------+ +-------+
  | bottom | | top   |
  +--------+ +-------+

  mobile
  +--------+
  |  top   |
  |--------|
  |        |
  | middle |
  |        |
  |--------|
  | bottom |
  +--------+

  tablet/desktop
  +--------+ +--------+
  |  top   | |        |
  |--------| | middle |
  | bottom | |        |
  +--------+ +--------+
デバイスごとにレイアウトを変えるには、
Bootstrap5のグリッドシステム(Grid System)を使うと簡単に実装することができます。
 Bootstrap Grid System
グリッドシステムを使用すると画面が12等分されます。
この場合、1行(Row)に1個のカラム(Col)を表示したいときは「size=12」、
1行(Row)に2個のカラム(Col)を表示したいときは「size=6」を指定します。
Bootstrap5のグリッドシステムには、4種類のクラス「xs, sm, md, lg」が用意されています。
- xs (phones) screen size < 768px:
スクリーンサイズが768px以下のデバイスに適用
- sm (tablets) screen size >= 768px :
スクリーンサイズが768pxと等しいかそれ以上のデバイスに適用
- md (small laptops) screen size >= 992px :
スクリーンサイズが992pxと等しいかそれ以上のデバイスに適用
- lg (laptops & desktops) screen size >= 1200px :
スクリーンサイズが1200pxと等しいかそれ以上のデバイスに適用
ここでは、「xs」と「sm」を使用してスマホ、タブレット、ディスクトップのレイアウトを変えています。
Webページをスマホで表示するときは、
DashのColコンポーネントの「xs」プロパティが適用されます。
Colコンポーネントに「size=12」プロパティを追加すると、
12等分された画面の全てのカラムを使用するので1行として表示されます。
したがって「top」と「bottom」は上下に表示されるようになります。
Webページをディスクトップに表示するときは、
Colコンポーネントの「sm」プロパティが適用されます。
Colコンポーネントに「size=6」のプロパティを追加すると、
「top」と「bottom」は左右に表示されるようになります。
このようにBootstrap5のクラス(xs, sm, md, lg)と、
DashのColコンポーネントの「size, order, offset」などのプロパティを使用することにより
Webページのレイアウトをデバイスごとに自由に変えることができます。
※ Dashは、PythonでWebアプリケーションを作成するためのフレームワークです。
Plotlyのグラフ描画ライブラリを利用しており、データを視覚化するために最適化されています。
Dashは、PythonのWebフレームワークであるFlaskをベースにしており、
Pythonの標準ライブラリを使用しているので、
パフォーマンスが高く、実行速度が速いといった特徴があります。
Dashは、Pythonを使用したデータ分析やデータ視覚化のためのツールとして広く使用されており、
ビジネスインテリジェンス、科学、エンジニアリング、金融、医療、教育などのさまざまな分野で使用されています。
Dashを使用することで、カスタマイズされたWebアプリケーションを比較的簡単に作成できます。
Dashは、PythonによるWebアプリケーション開発において選択肢にいれておきたい開発ツールのひとつです。
説明文の左側に図の画像が表示されていますが縮小されています。
画像を拡大するにはマウスを画像上に移動してクリックします。
画像が拡大表示されます。拡大された画像を閉じるには右上の[X]をクリックします。
画像の任意の場所をクリックして閉じることもできます。
-
まずは、Pythonの開発環境を準備する
まずは、
「記事(Article137)」を参照して、
Pythonの開発環境を準備してください。
ここでは、Pythonのプロジェクトフォルダとして「Dash」を使用しています。
 図1
図1は、Visual Studio Code(VS Code)の「Terminal」メニューから「New Terminal」を選択して、
「Terminal」ウィンドウを開いたときの画面です。 緑色の「(venv)」が表示されていれば、
Pythonの仮想環境が正常に作成されていることになります。
図1
図1は、Visual Studio Code(VS Code)の「Terminal」メニューから「New Terminal」を選択して、
「Terminal」ウィンドウを開いたときの画面です。 緑色の「(venv)」が表示されていれば、
Pythonの仮想環境が正常に作成されていることになります。
-
Visual Studio Codeを起動してプログラムファイルを作成する
ここでは、DashのContainerコンポーネントを使用してWebページに「Hello World!」を表示します。
そして、ブラウザにWebページが表示されたら、DashがどのようなHTML要素を生成するかを確認します。
リスト2-1: Article143.py
# Article143.py
# Import python libraries
from dash import Dash, html, dcc, Input, Output, dash_table # pip install dash
import dash_bootstrap_components as dbc # pip install dash-bootstrap-components
import plotly.graph_objects as go
import pandas as pd
import requests
import math

### Instantiate Dash
app = Dash(__name__)
app.title = 'Dash Switch between two layouts based on screen size'

### Generate Container
app.layout = dbc.Container('Hello World!')

### Run the server
if __name__ == '__main__':
    app.run_server(debug=True)
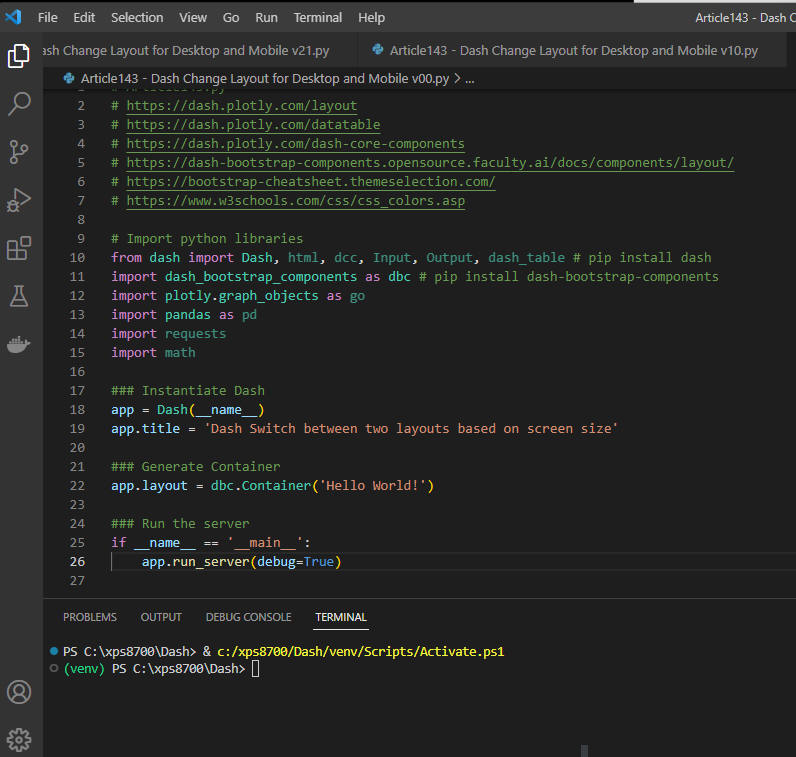 図2-1
図2-1は、VS Codeの編集画面にプログラムのソースコードが表示されている画面です。
図2-1
図2-1は、VS Codeの編集画面にプログラムのソースコードが表示されている画面です。
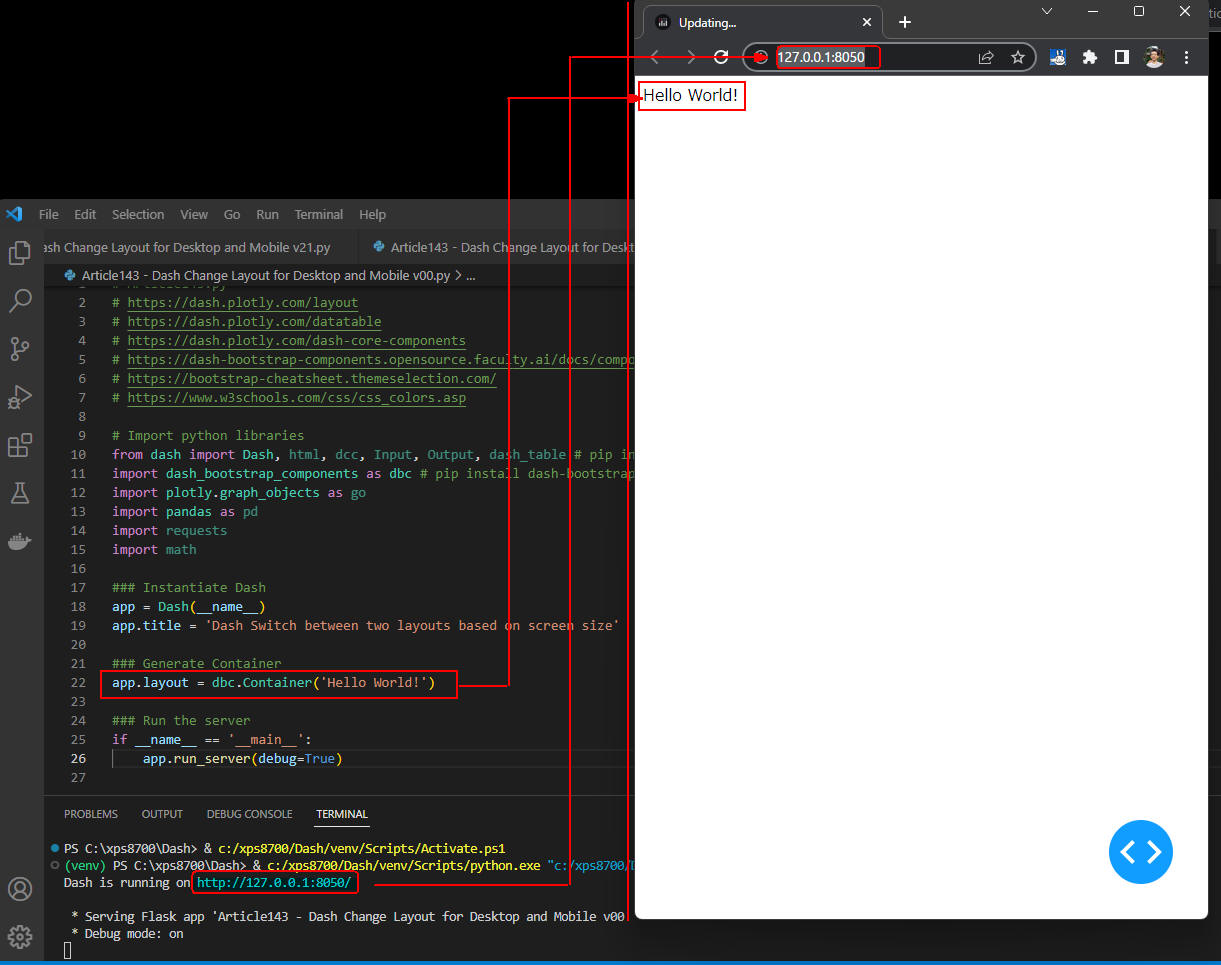 図2-2
アプリが起動すると「Dash is running on http://....」のメッセージが表示されます。
[Ctrl]を押しながらマウスで「URL」のリンクをクリックします。
しばらくすると、デフォルトのブラウザにアプリのWebページが表示されます。
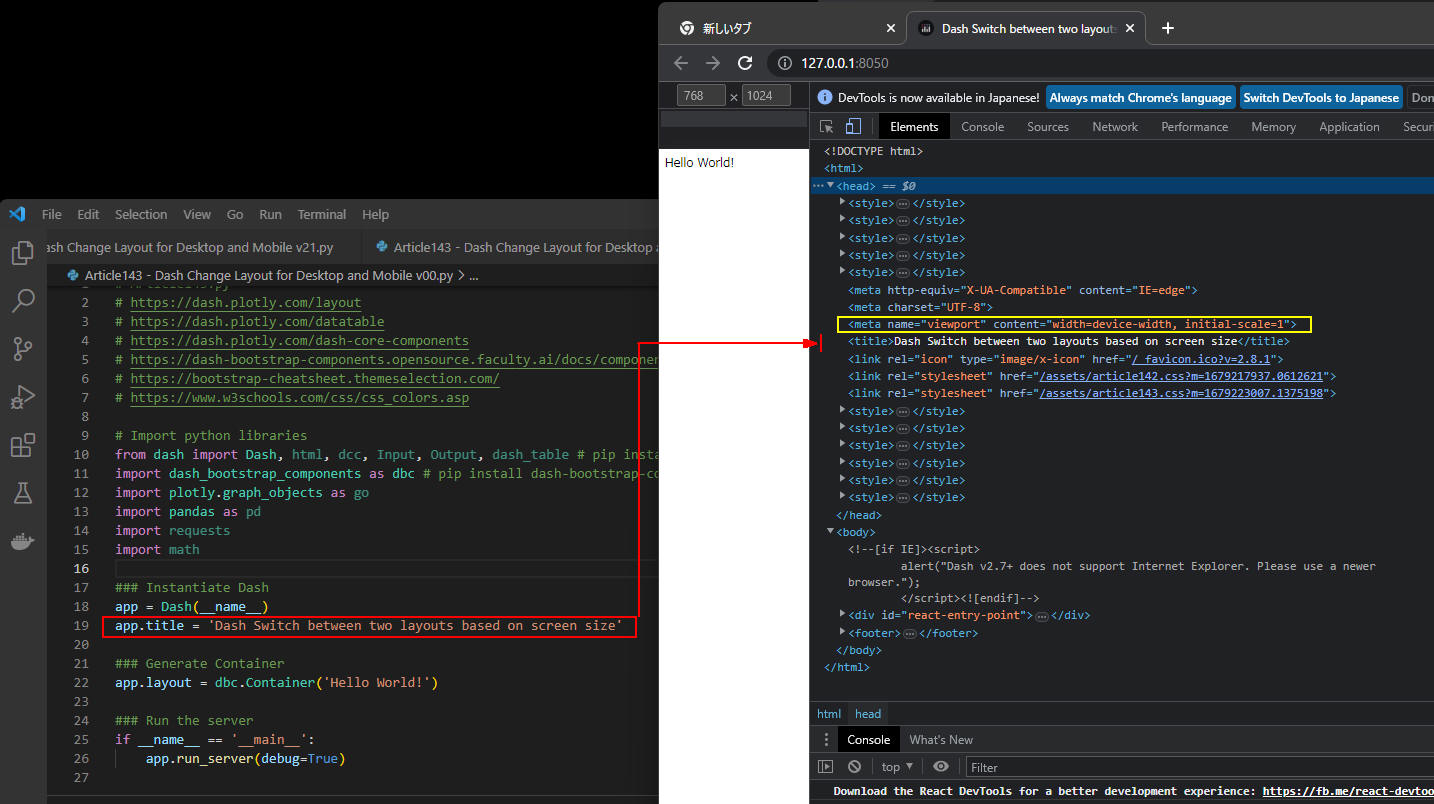 図2-3
図2-3では、ブラウザ(Google Chrome)から[F12]をクリックしてデバッグツールを表示しています。
そしてタブメニューから「Elements」をクリックしてHTML要素を表示しています。
HTMLのHeader要素には「meta」タグの「name="viewport", content="...."」が追加されているので、
デフォルトの状態でレスポンシブウェブデザインに対応していることになります。
図2-3
図2-3では、ブラウザ(Google Chrome)から[F12]をクリックしてデバッグツールを表示しています。
そしてタブメニューから「Elements」をクリックしてHTML要素を表示しています。
HTMLのHeader要素には「meta」タグの「name="viewport", content="...."」が追加されているので、
デフォルトの状態でレスポンシブウェブデザインに対応していることになります。
「title」要素には、デフォルトで「Dash」が生成されます。
ここでは、「app.title='Dash Switch...'」を追加してアプリのタイトルに書き換えています。
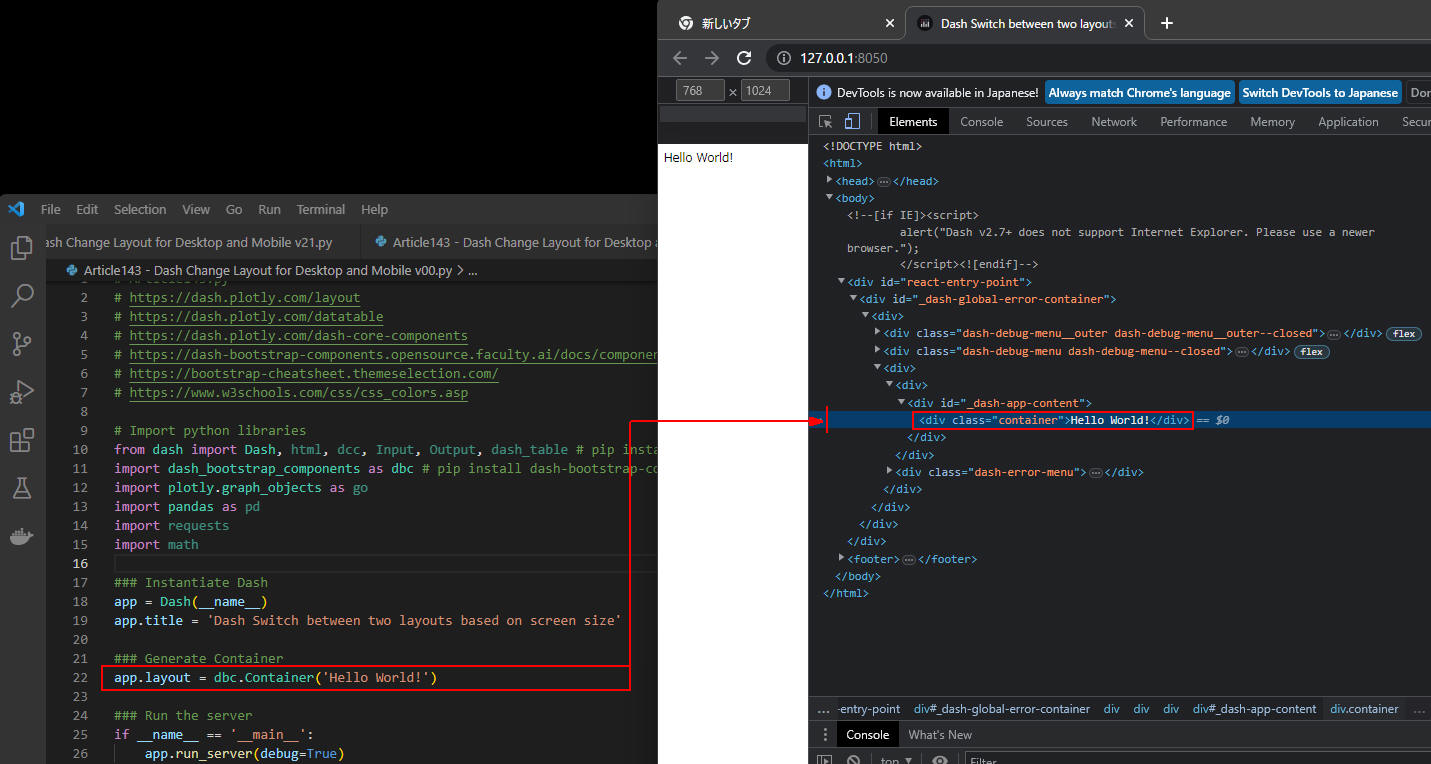 図2-4
図2-4では、「dbc.Container('Hello World!')」がどのように生成されるか確認しています。
この図から分かるように「Hell World!」は「div.container」要素内に格納されています。
Dashの「style」プロパティで対応できないときは、アプリ独自のCSSクラスを追加することができます。
図2-4
図2-4では、「dbc.Container('Hello World!')」がどのように生成されるか確認しています。
この図から分かるように「Hell World!」は「div.container」要素内に格納されています。
Dashの「style」プロパティで対応できないときは、アプリ独自のCSSクラスを追加することができます。
-
2カラムのWebページを作成してスマホ、タブレット、ディスクトップで表示したときにレイアウトを変える
ここでは、2カラム(top, bottom)から構成されるWebページをデザインしてデバイスごとにレイアウトを変えています。
リスト3-1にざっくりしたレイアウトを掲載しています。
Webページをスマホで表示したときは、上下に「top, bottom」のように表示させます。
Webページをタブレット、ディスクトップに表示したときは、左右に「bottom, top」のように表示させます。
リスト3-2のスタイルシート(CSS)では、デバイスのスクリーン幅ごとに独自のテキスト文字を挿入して表示させています。
たとえば、Webページをスマホで表示したときは行12-19のCSSが適用されて、
「top」には「TOP ▶767px to lower resolution」が表示されます。
そして「bottom」には「BOTTOM ▶767px to lower resolution」が表示されます。
Webページをタブレット、ディスクトップで表示したときは行2-9のCSSが適用されて、
「top」には「RIGHT ▶768px to higher resolution」が表示されます。
そして「bottom」には「LEFT ▶768px to higher resolution」が表示されます。
これで、どのCSSが適用されたかが分かります。
デバイスごとにWebページのレイアウトを変えるには、
Bootstrap5のスタイルシートを使用すると簡単に実装することができます。
ここでは、Bootstrap5のグリッドシステムを使用しています。
グリッドシステムを使用すると画面が12等分されます。
この場合、1行に1個のColコンポーネント(1段組)を表示したいときは「size=12」、
1行に2個のColコンポーネント(2段組)を表示したいときは「size=6」を指定します。
Bootstrap5のグリッドシステムには、4種類のクラス「xs, sm, md, lg」が用意されています。
ここでは、「xs」と「sm」を使用してスマホ、タブレット、ディスクトップのレイアウトを変えています。
Webページをスマホで表示するときは、
DashのColコンポーネントの「xs」プロパティが適用されます。
つまり、行39, 44が適用されます。
Colコンポーネントに「size=12」プロパティを追加すると、
12等分された画面の全てのカラムを使用するので1行として表示されます。
したがって「top」と「bottom」は上下に表示されるようになります。
ここでは、さらに「top」のColに「order=2」、「bottom」のColに「order=1」を指定しているので、
画面には「bottom, top」の順に上下に表示されます。
Webページをディスクトップに表示するときは、
Colコンポーネントの「sm」プロパティが適用されます。
つまり、行40, 45が適用されます。
ここでは、Colコンポーネントに「size=6」のプロパティを追加しているので、
「top」と「bottom」は左右に表示されるようになります。
さらに、「top」のColに「order=1」、
「bottom」のColに「order=2」を指定しているので、
画面には「top, bottom」の順に左右に表示されます。
リスト3-1: Article143.py
# Article143.py
# Import python libraries
from dash import Dash, html, dcc, Input, Output, dash_table # pip install dash
import dash_bootstrap_components as dbc # pip install dash-bootstrap-components
import plotly.graph_objects as go
import pandas as pd
import requests
import math

'''
  mobile
  +--------+
  |  top   |
  |--------|
  | bottom |
  +--------+

  desktop
  +--------+--------+
  | bottom | top    |
  +--------+--------+

'''
### Lay out the top of the web page
top = html.Div(id='top1', style={'height': '20em', 'background-color': 'dodgerblue', 'color': 'White'})

### Lay out the bottom of the web page
bottom = html.Div(id='bottom1', style={'height': '20em', 'background-color': 'mediumseagreen', 'color': 'white'})

### Instantiate Dash
app = Dash(__name__, external_stylesheets=[dbc.themes.CYBORG])
app.title = 'Dash Switch between two layouts based on screen size'

### Generate Container
app.layout = dbc.Container([
    dbc.Row([
        dbc.Col(
            bottom,
            xs=dict(order=2, size=12),  # mobile(Bottom)
            sm=dict(order=1, size=6)    # tablet, desktop(Left)
        ),
        dbc.Col(
            top,
            xs=dict(order=1, size=12),  # mobile(Top)
            sm=dict(order=2, size=6)    # tablet, desktop(Right)
        ),
    ])
], fluid=True)

### Run the server
if __name__ == '__main__':
    app.run_server(debug=True)
リスト3-2: assets/article143.css
/* Device = 768px to higher resolution device */
@media (min-width: 768px) {
    div#top1::after {
        content: "RIGHT ▶768px to higher resolution";
    }
    div#bottom1::after {
        content: "LEFT ▶768px to higher resolution";
    }
}

/* Device = 767px to lower resolution device */
@media (max-width: 767px) {
    div#top1::after {
        content: "TOP ▶767px to lower resolution";
    }
    div#bottom1::after {
        content: "BOTTOM ▶767px to lower resolution";
    }
}
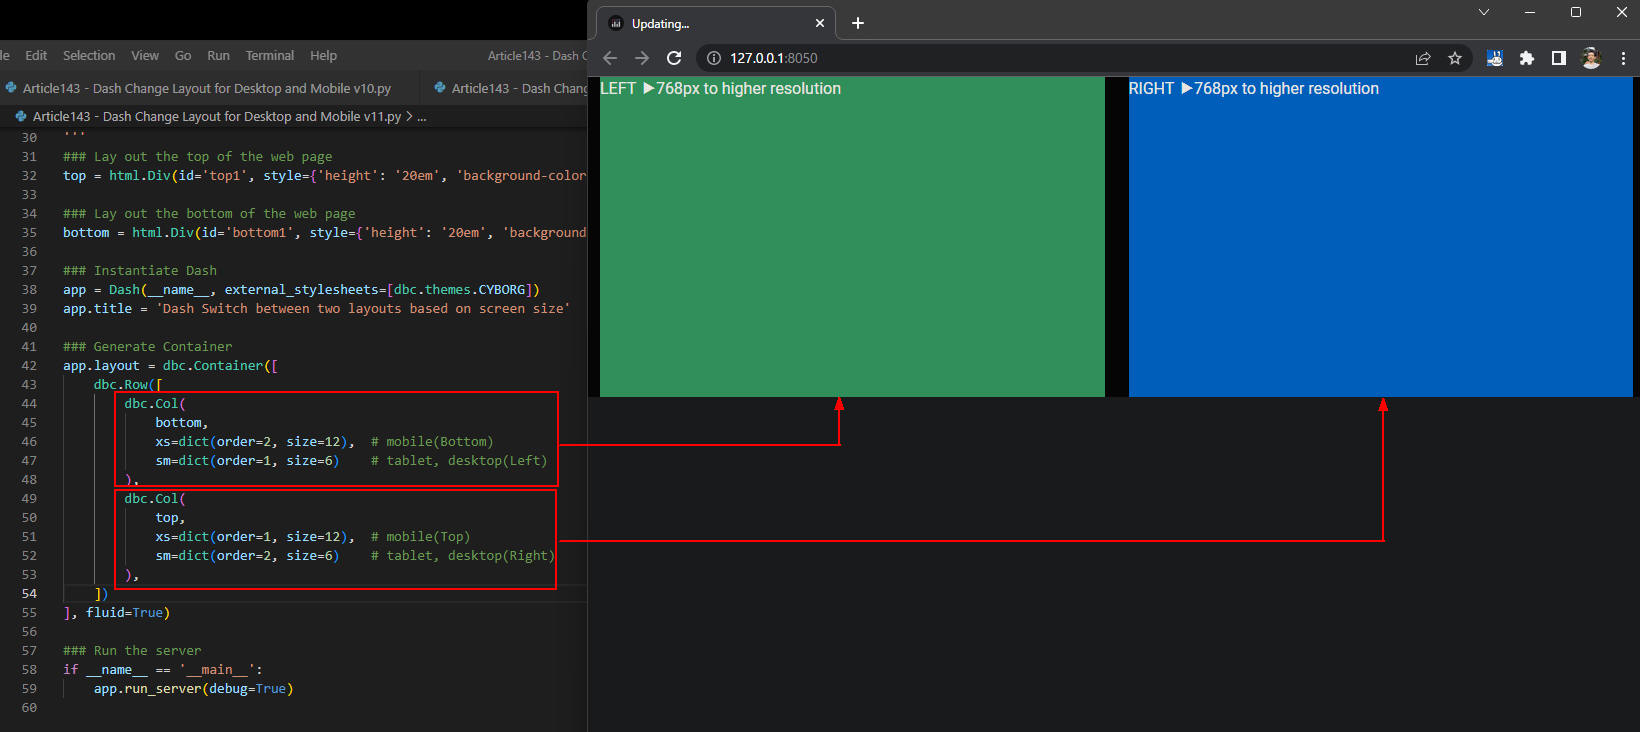 図3-1
図3-1は、Webページをディスクトップに表示させたときの画面です。
「bottom」のカラムには「LEFT ▶768px to higher resolution」が表示されています。
「top」のカラムには「RIGHT ▶768px to higher resolution」が表示されています。
これでCSSの「@media (min-width: 768px)」が適用されたことが確認できました。
図3-1
図3-1は、Webページをディスクトップに表示させたときの画面です。
「bottom」のカラムには「LEFT ▶768px to higher resolution」が表示されています。
「top」のカラムには「RIGHT ▶768px to higher resolution」が表示されています。
これでCSSの「@media (min-width: 768px)」が適用されたことが確認できました。
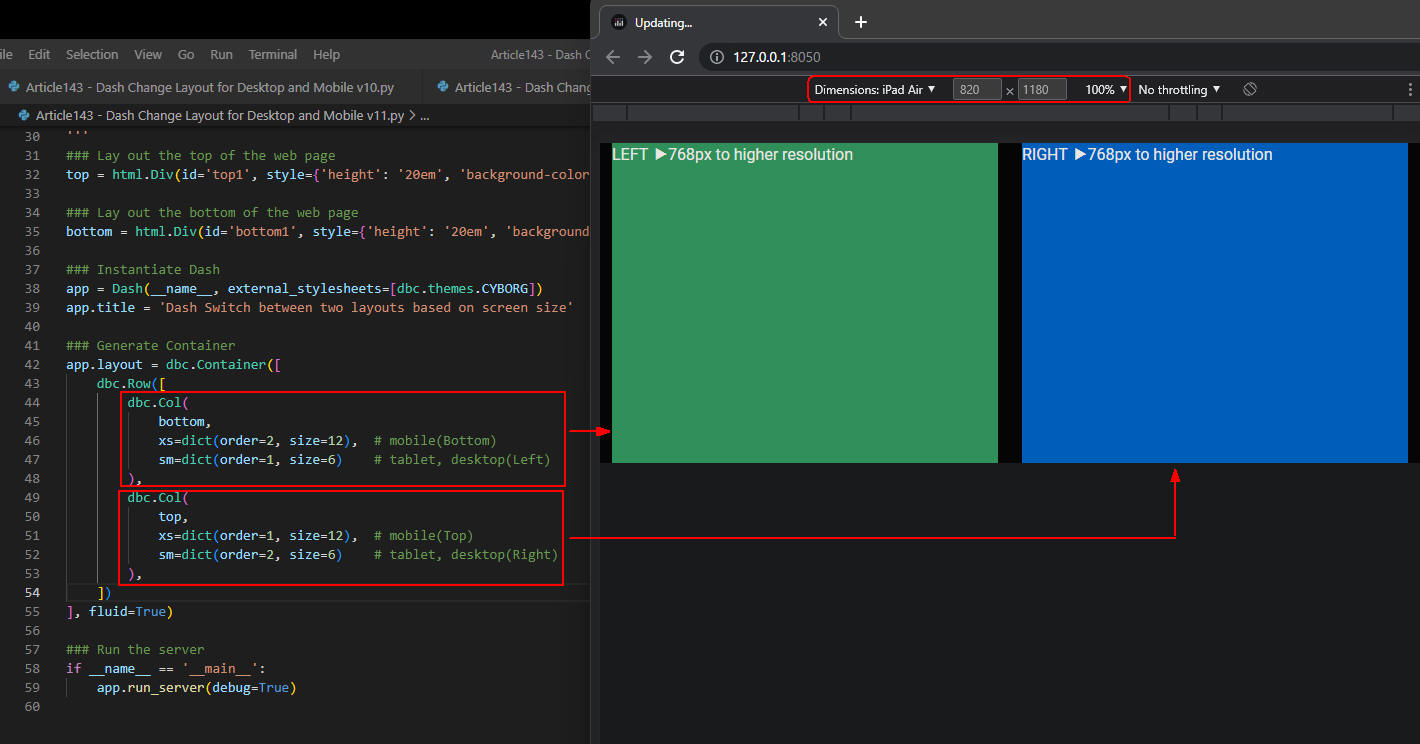 図3-2
図3-2は、Webページを「iPad Air」に表示させたときの画面です。
スクリーンの幅が768px以上あるのでディスクトップと同じレイアウトで表示されています。
図3-2
図3-2は、Webページを「iPad Air」に表示させたときの画面です。
スクリーンの幅が768px以上あるのでディスクトップと同じレイアウトで表示されています。
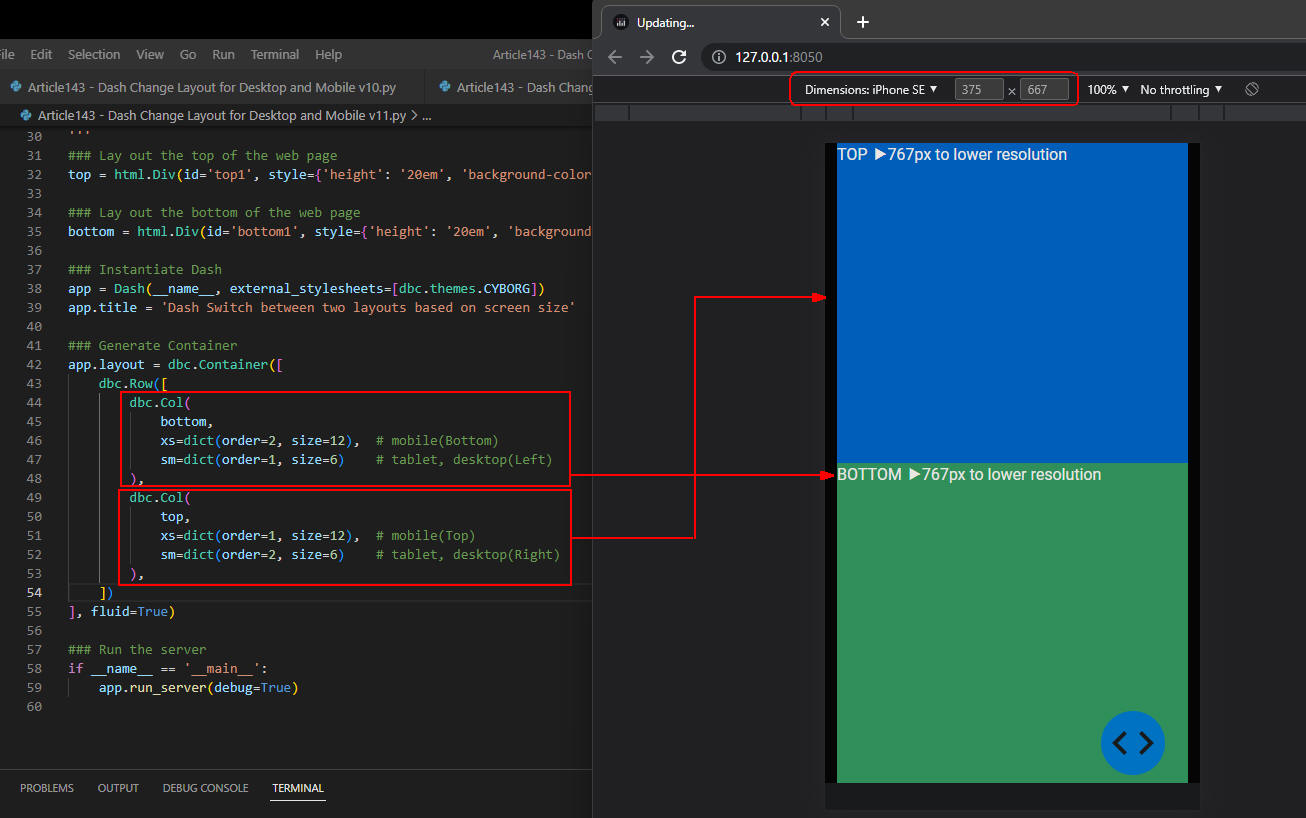 図3-3
図3-3では、Webページを「iPhone SE」に表示させたときの画面です。
スクリーンの幅が767px以下なので、
「top」のカラムに「TOP ▶767px to lower resolution」が表示されています。
そして「bottom」のカラムには「BOTTOM ▶767px to lower resolution」が表示されています。
これでCSSの「@media (max-width: 767px)」が適用されたことが確認できました。
図3-3
図3-3では、Webページを「iPhone SE」に表示させたときの画面です。
スクリーンの幅が767px以下なので、
「top」のカラムに「TOP ▶767px to lower resolution」が表示されています。
そして「bottom」のカラムには「BOTTOM ▶767px to lower resolution」が表示されています。
これでCSSの「@media (max-width: 767px)」が適用されたことが確認できました。
-
3カラムのWebページを作成してスマホ、タブレット、ディスクトップで表示したときにレイアウトを変える
ここでは、3カラム(top, middle, bottom)から構成されるWebページをデザインしてデバイスごとにレイアウトを変えています。
リスト4-1にざっくりしたレイアウトを掲載しています。
Webページをスマホで表示したときは、上下に「top, middle, bottom」のように表示させます。
Webページをタブレット、ディスクトップに表示したときは、2段組にします。
左側には「top, bottom」、右側には「middle」を表示させます。
リスト4-2のスタイルシート(CSS)では、デバイスのスクリーン幅ごとに独自のテキスト文字を挿入して表示させています。
たとえば、Webページをスマホで表示したときは、行15-25のCSSが適用されます。
この場合、「top」のカラムには「TOP ▶767px to lower resolution」、
「middle」のカラムには「MIDDLE ▶767px to lower resolution」、
「bottom」のカラムには「BOTTOM ▶767px to lower resolution」が表示されます。
Webページをタブレット、ディスクトップで表示したときは、行2-12のCSSが適用されます。
そして、「top」のカラムには「TOP(LEFT) ▶768px to higher resolution」、
「middle」のカラムには「MIDDLE(RIGHT) ▶768px to higher resolution」、
「bottom」のカラムには「BOTTOM(LEFT) ▶768px to higher resolution」が表示されます。
行27-34のCSSでは、Webページをタブレット、ディスクトップに表示したときに、
「top」と「bottom」の間に余分な空白が確保されないようにしています。
CSSのflexを使用すると各種デバイスに対応させてWebページを自由にデザインすることが可能になります。
リスト4-1: Article143.py
# Article143.py
# Import python libraries
from dash import Dash, html, dcc, Input, Output, dash_table # pip install dash
import dash_bootstrap_components as dbc # pip install dash-bootstrap-components
import plotly.graph_objects as go
import pandas as pd
import requests
import math

'''
  mobile
  +--------+
  |  top   |
  |--------|
  |        |
  | middle |
  |        |
  |--------|
  | bottom |
  +--------+

  desktop
  +--------+ +--------+
  |  top   | |        |
  |--------| | middle |
  | bottom | |        |
  +--------+ +--------+

'''
### Lay out the top of the web page
top = html.Div(id='top2', style={'height': '10em', 'background-color': 'dodgerblue', 'color': 'White'})

### Lay out the middle of the web page
middle = html.Div(id='middle2', style={'height': '20em', 'background-color': 'tomato', 'color': 'white'})

### Lay out the bottom of the web page
bottom = html.Div(id='bottom2', style={'height': '10em', 'background-color': 'mediumseagreen', 'color': 'white'})

### Instantiate Dash
app = Dash(__name__, external_stylesheets=[dbc.themes.CYBORG])
app.title = 'Dash Switch between two layouts based on screen size'

### Generate Container
app.layout = dbc.Container([
    dbc.Row([
        dbc.Col(
            top,
            xs=dict(order=1, size=12),  # mobile
            sm=dict(order=1, size=6)    # tablet, desktop
        ),
        dbc.Col(
            middle,
            xs=dict(order=2, size=12),  # mobile
            sm=dict(order=3, size=6)    # tablet, desktop
        ),
        dbc.Col(
            bottom,
            xs=dict(order=3, size=12),  # mobile
            sm=dict(order=2, size=6)    # tablet, desktop
        )
    ], className='flex-container')
], fluid=True)

### Run the server
if __name__ == '__main__':
    app.run_server(debug=True)
リスト4-2: assets/article143.css
/* Device = 768px to higher resolution device */
@media (min-width: 768px) {
    div#top2::after {
        content: "TOP(LEFT) ▶768px to higher resolution";
    }
    div#middle2::after {
        content: "MIDDLE(RIGHT) ▶768px to higher resolution";
    }
    div#bottom2::after {
        content: "BOTTOM(LEFT) ▶768px to higher resolution";
    }
}

/* Device = 767px to lower resolution device */
@media (max-width: 767px) {
    div#top2::after {
        content: "TOP ▶767px to lower resolution";
    }
    div#middle2::after {
        content: "MIDDLE ▶767px to lower resolution";
    }
    div#bottom2::after {
        content: "BOTTOM ▶767px to lower resolution";
    }
}

@media screen and (min-width: 768px) {
    .flex-container {
        display: flex;
        flex-wrap: wrap;
        flex-direction: column;
        height: 350px;
    }
}
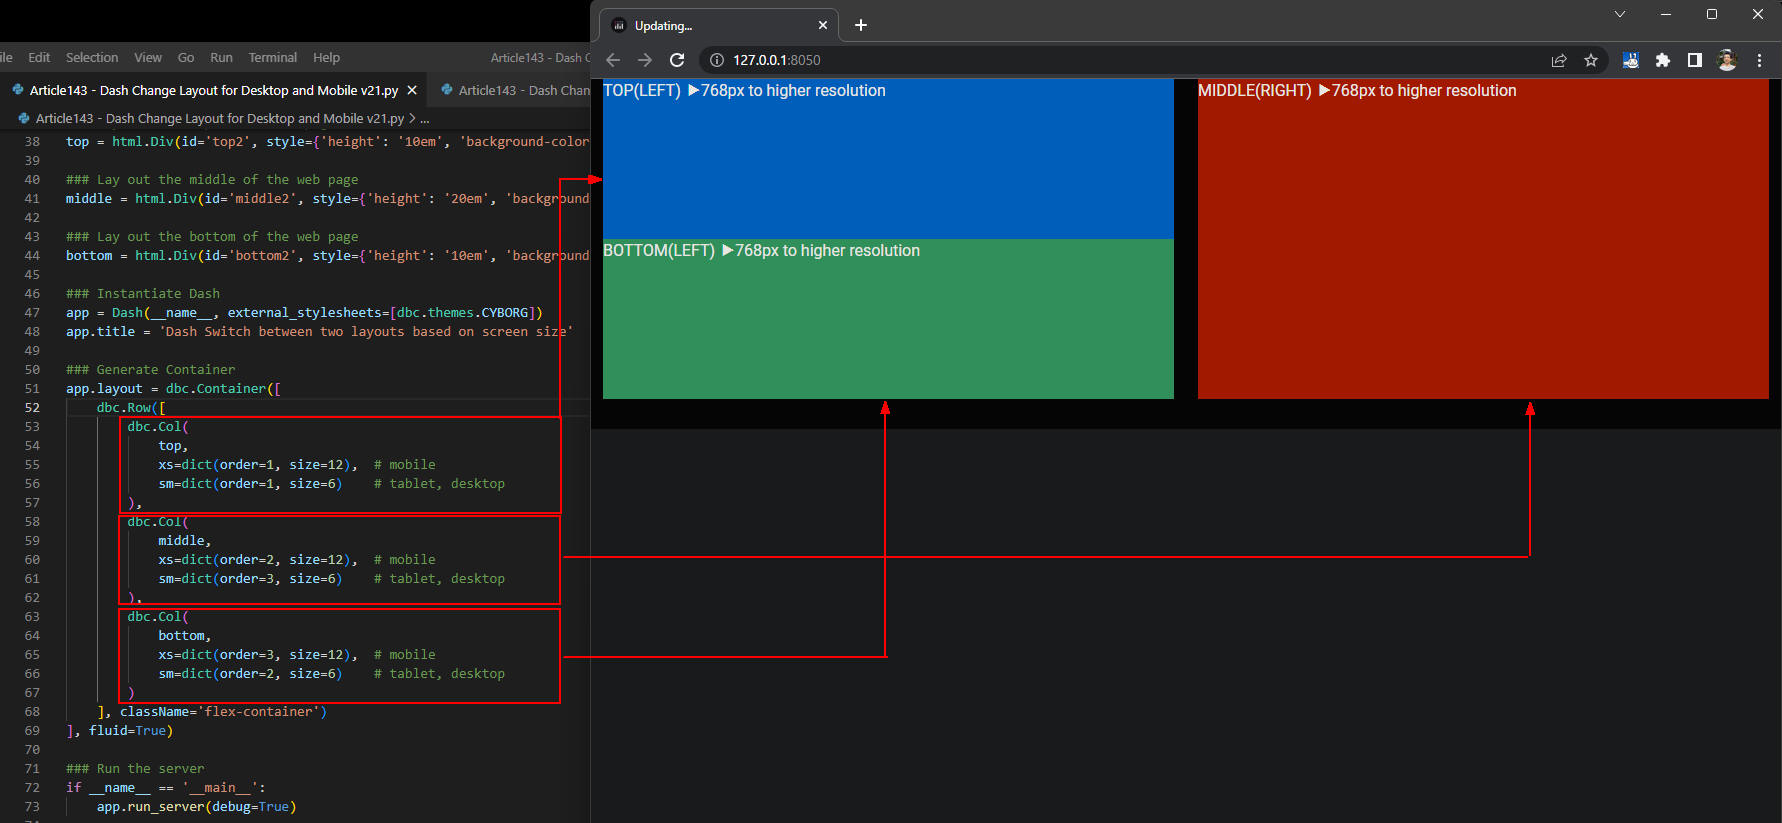 図4-1
図4-1では、Webページをディスクトップに表示させています。
スクリーン幅が768px以上なので「@media (min-width: 768px)」が適用されます。
そして、「top」には「TOP(LEFT) ▶768px to higher resolution」、
「middle」には「MIDDLE(RIGHT) ▶768px to higher resolution」、
「bottom」には「BOTTOM(LEFT) ▶768px to higher resolution」が表示されています。
図4-1
図4-1では、Webページをディスクトップに表示させています。
スクリーン幅が768px以上なので「@media (min-width: 768px)」が適用されます。
そして、「top」には「TOP(LEFT) ▶768px to higher resolution」、
「middle」には「MIDDLE(RIGHT) ▶768px to higher resolution」、
「bottom」には「BOTTOM(LEFT) ▶768px to higher resolution」が表示されています。
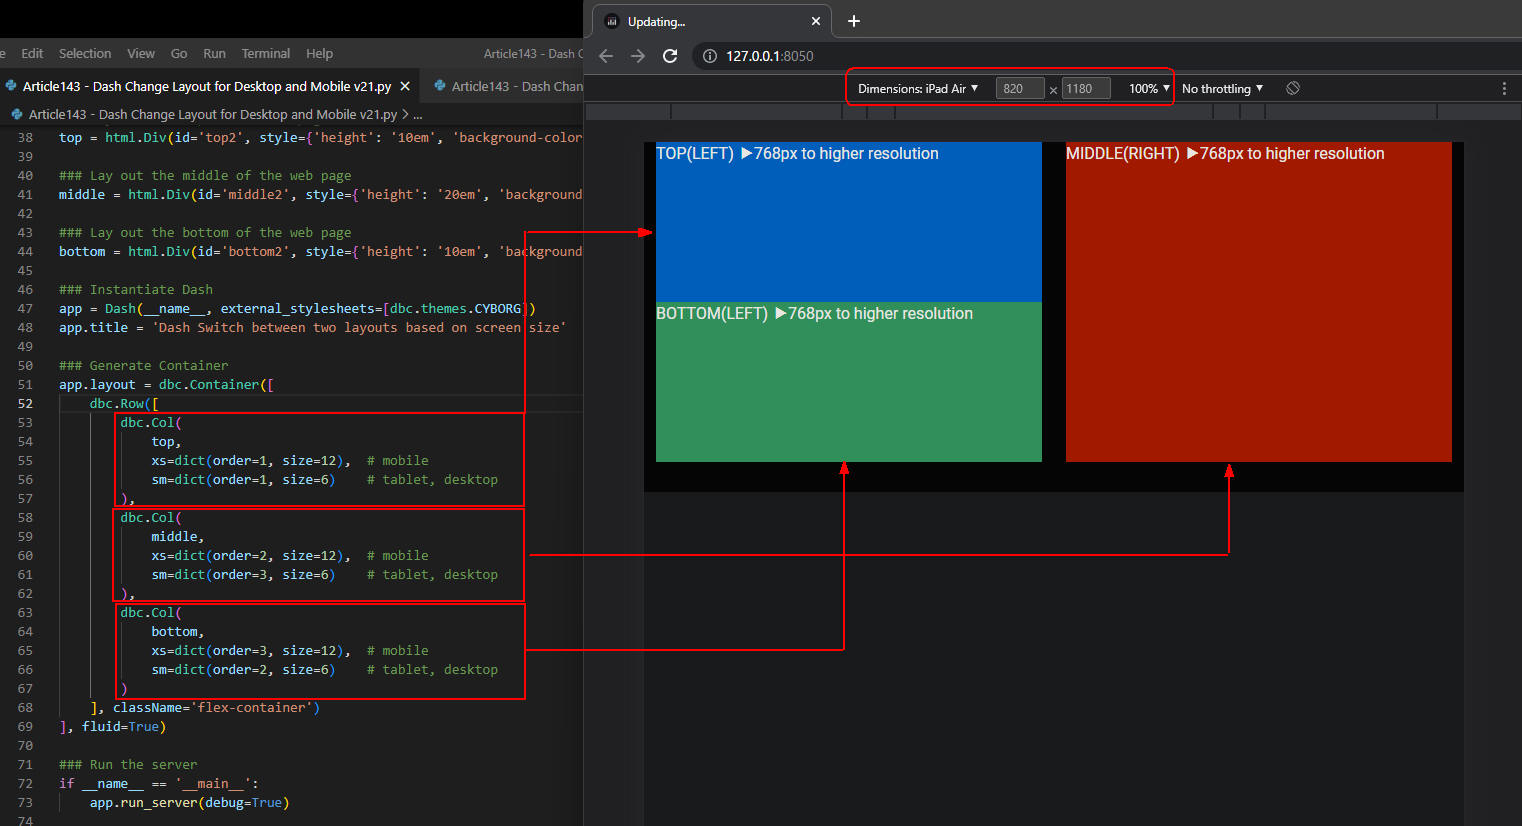 図4-2
図4-2では、Webページをタブレットに表示させています。
スクリーン幅が768px以上なので「@media (min-width: 768px)」が適用されます。
「top, middle, bottom」には、ディスクトップと同じ文字が表示されます。
図4-2
図4-2では、Webページをタブレットに表示させています。
スクリーン幅が768px以上なので「@media (min-width: 768px)」が適用されます。
「top, middle, bottom」には、ディスクトップと同じ文字が表示されます。
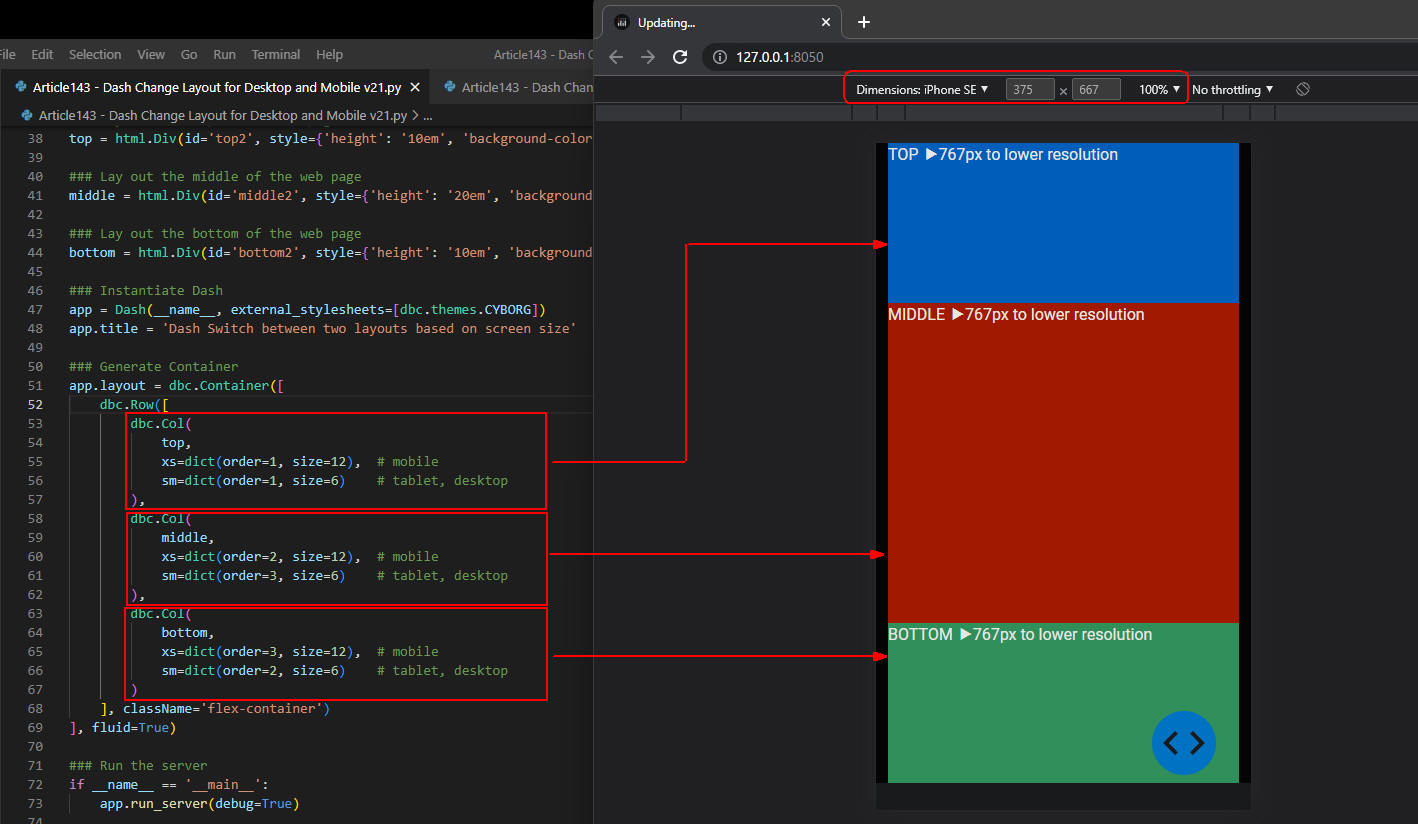 図4-3
図4-3では、Webページをスマホに表示させています。
スクリーン幅が767px以下なので「@media (max-width: 767px) 」が適用されます。
そして「top」には「TOP ▶767px to lower resolution」、
「middle」には「MIDDLE ▶767px to lower resolution」、
「bottom」には「BOTTOM ▶767px to lower resolution」が表示されます。
図4-3
図4-3では、Webページをスマホに表示させています。
スクリーン幅が767px以下なので「@media (max-width: 767px) 」が適用されます。
そして「top」には「TOP ▶767px to lower resolution」、
「middle」には「MIDDLE ▶767px to lower resolution」、
「bottom」には「BOTTOM ▶767px to lower resolution」が表示されます。
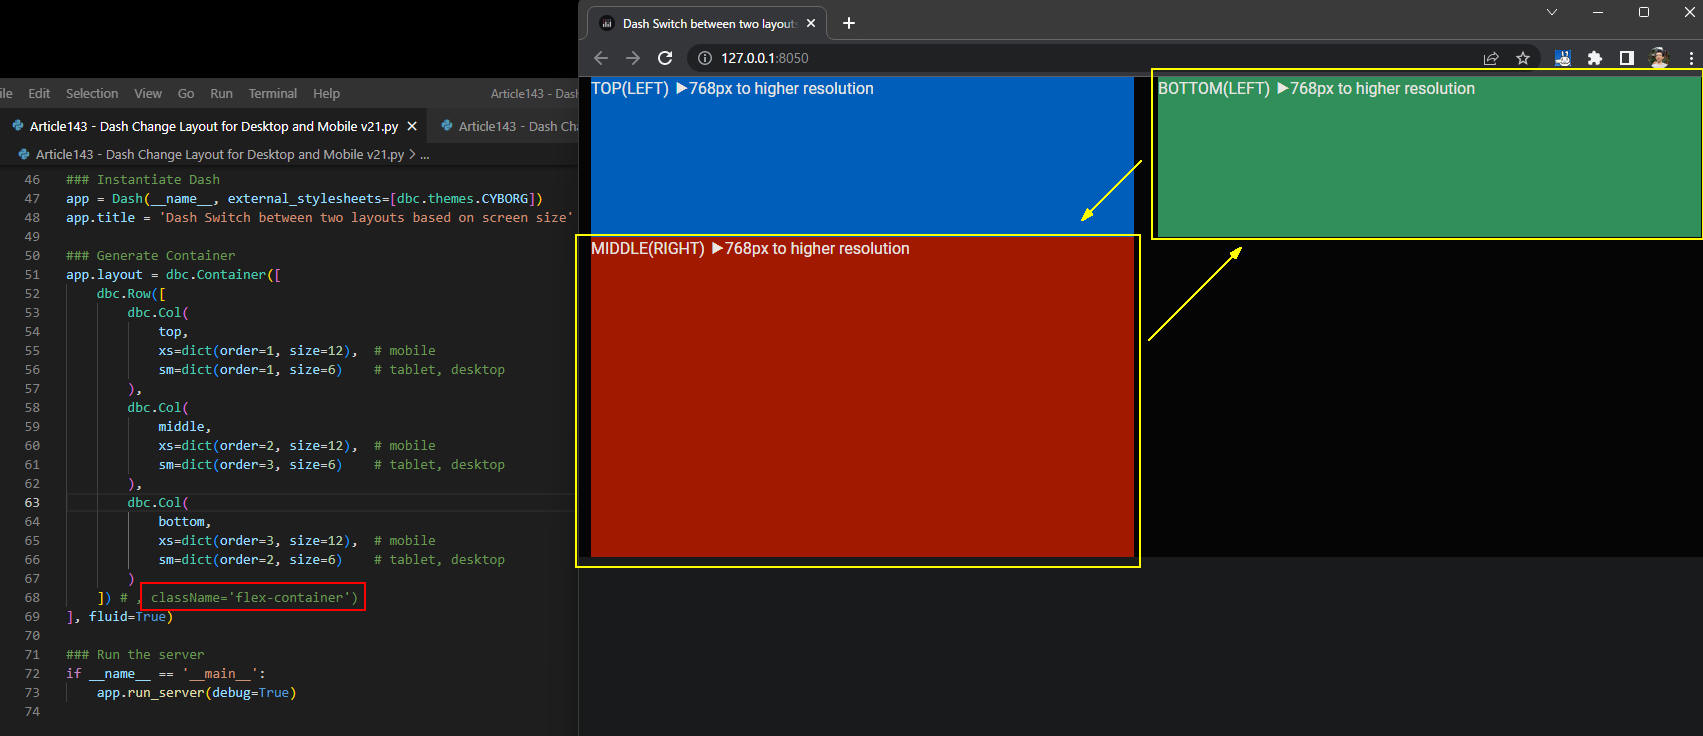 図4-4
図4-4では、RowコンポーネントにCSSのクラス「flex-container」を適用させないときの画面です。
図のように左側には「top, middle」が表示され、右側には「bottom」が表示されています。
CSSのflexを適用させるとこのような不都合を回避させることができます。
図4-4
図4-4では、RowコンポーネントにCSSのクラス「flex-container」を適用させないときの画面です。
図のように左側には「top, middle」が表示され、右側には「bottom」が表示されています。
CSSのflexを適用させるとこのような不都合を回避させることができます。
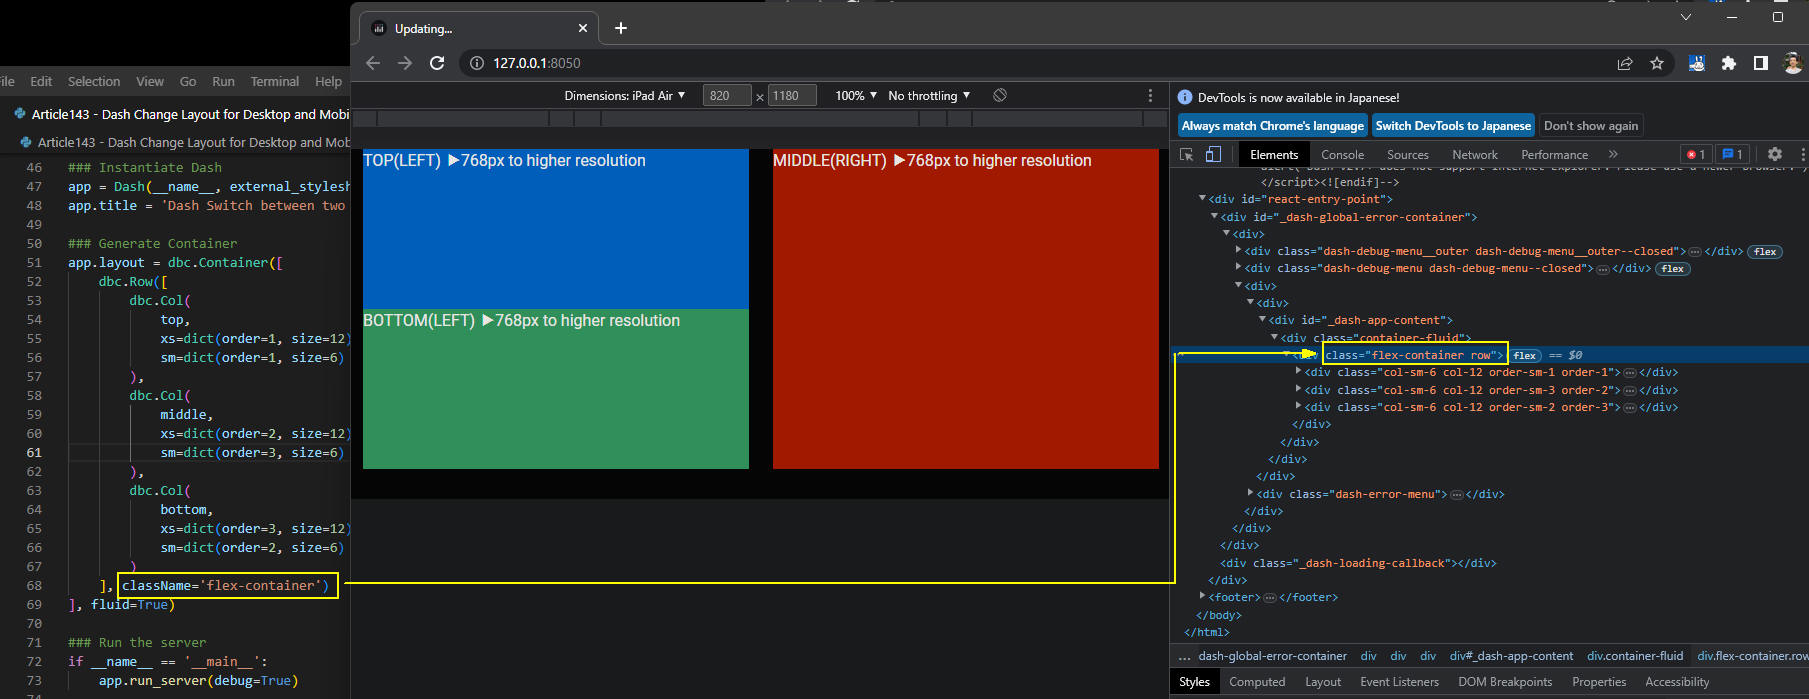 図4-5
図4-5では、RowコンポーネントにCSSのクラス「flex-container」を適用させたときの画面です。
ここでは、ブラウザのデバッグツールでCSSがどのHTML要素に追加されたかを確認しています。
図から分かるように「div.row」の要素に追加されています。
Dashの「style」プロパティで解決できないときは、独自のCSSを追加して不都合を回避します。
図4-5
図4-5では、RowコンポーネントにCSSのクラス「flex-container」を適用させたときの画面です。
ここでは、ブラウザのデバッグツールでCSSがどのHTML要素に追加されたかを確認しています。
図から分かるように「div.row」の要素に追加されています。
Dashの「style」プロパティで解決できないときは、独自のCSSを追加して不都合を回避します。
-
最終版の全てのコードを掲載
ここでは、最終版のプログラムのソースコードと、 スタイルシートを掲載しています。
CSSファイル(article143.css)は「assets」フォルダに格納しておくと自動的に取り込まれます。
リスト5-1: Article143.py
# Article143.py
# https://dash.plotly.com/layout
# https://dash.plotly.com/datatable
# https://dash.plotly.com/dash-core-components
# https://dash-bootstrap-components.opensource.faculty.ai/docs/components/layout/
# https://bootstrap-cheatsheet.themeselection.com/
# https://www.w3schools.com/css/css_colors.asp

# Import python libraries
from dash import Dash, html, dcc, Input, Output, dash_table # pip install dash
import dash_bootstrap_components as dbc # pip install dash-bootstrap-components
import plotly.graph_objects as go
from decimal import Decimal
import pandas as pd
import requests
import math

'''
  mobile
  +--------+
  |  top   |
  |--------|
  |        |
  | middle |
  |        |
  |--------|
  | bottom |
  +--------+

  desktop
  +--------+ +--------+
  |  top   | |        |
  |--------| | middle |
  | bottom | |        |
  +--------+ +--------+

'''
### Lay out the top of the web page
top = html.Div(id='top2', style={'height': '10em', 'background-color': 'dodgerblue', 'color': 'White'})

### Lay out the middle of the web page
middle = html.Div(id='middle2', style={'height': '20em', 'background-color': 'tomato', 'color': 'white'})

### Lay out the bottom of the web page
bottom = html.Div(id='bottom2', style={'height': '10em', 'background-color': 'mediumseagreen', 'color': 'white'})

### Instantiate Dash
app = Dash(__name__, external_stylesheets=[dbc.themes.CYBORG])
app.title = 'Dash Switch between two layouts based on screen size'

### Generate Container
app.layout = dbc.Container([
    dbc.Row([
        dbc.Col(
            top,
            xs=dict(order=1, size=12),  # mobile
            sm=dict(order=1, size=6)    # tablet, desktop
        ),
        dbc.Col(
            middle,
            xs=dict(order=2, size=12),  # mobile
            sm=dict(order=3, size=6)    # tablet, desktop
        ),
        dbc.Col(
            bottom,
            xs=dict(order=3, size=12),  # mobile
            sm=dict(order=2, size=6)    # tablet, desktop
        )
    ], className='flex-container')
], fluid=True)

### Run the server
if __name__ == '__main__':
    app.run_server(debug=True)
リスト5-2: assets/Article143.css
/* Device = 768px to higher resolution device */
@media (min-width: 768px) {
    div#top1::after {
        content: "RIGHT ▶768px to higher resolution";
    }
    div#bottom1::after {
        content: "LEFT ▶768px to higher resolution";
    }
}

/* Device = 767px to lower resolution device */
@media (max-width: 767px) {
    div#top1::after {
        content: "TOP ▶767px to lower resolution";
    }
    div#bottom1::after {
        content: "BOTTOM ▶767px to lower resolution";
    }
}

/* Device = 768px to higher resolution device */
@media (min-width: 768px) {
    div#top2::after {
        content: "TOP(LEFT) ▶768px to higher resolution";
    }
    div#middle2::after {
        content: "MIDDLE(RIGHT) ▶768px to higher resolution";
    }
    div#bottom2::after {
        content: "BOTTOM(LEFT) ▶768px to higher resolution";
    }
}

/* Device = 767px to lower resolution device */
@media (max-width: 767px) {
    div#top2::after {
        content: "TOP ▶767px to lower resolution";
    }
    div#middle2::after {
        content: "MIDDLE ▶767px to lower resolution";
    }
    div#bottom2::after {
        content: "BOTTOM ▶767px to lower resolution";
    }
}

@media screen and (min-width: 768px) {
    .flex-container {
        display: flex;
        flex-wrap: wrap;
        flex-direction: column;
        height: 350px;
    }
}