仮想通貨(暗号通貨)の価格を取得して予測する
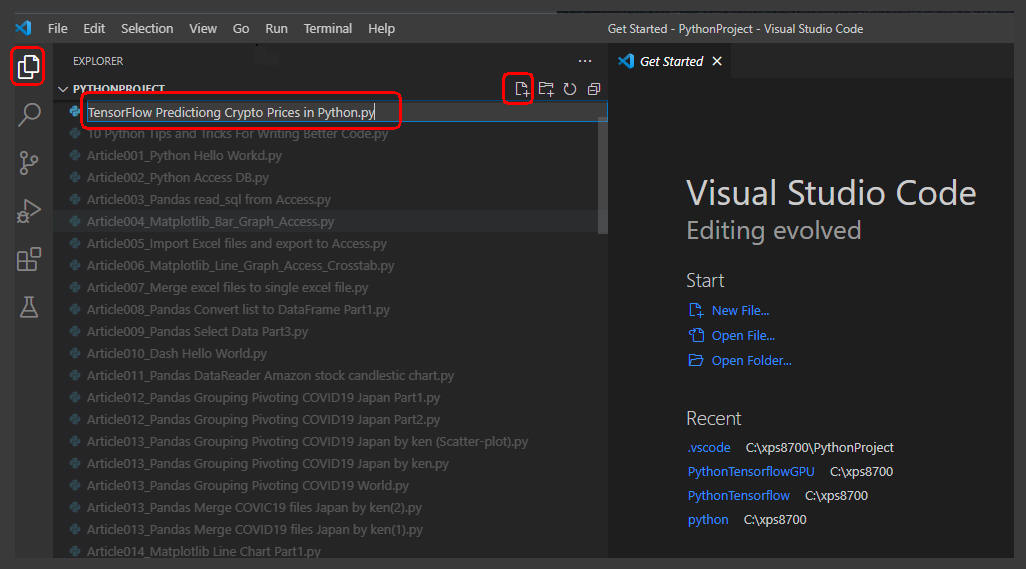
Visual Studio Code(VSC)から[Explorer]、[New File]のアイコンをクリックしてテキストボックスに
「TensorFlow Predictiong Crypto Prices in Python.py」を入力します。
プログラムの編集ウィンドウが表示されたら行1-96のコードをコピペします。
行10-24のPythonライブラリの「import」でエラーが表示されるときは、
VSCの「TERMINAL」ウィンドウから「pip install ...」で該当するライブラリをインストールします。
pip installのコマンドはコメントで記載しています。
なお、VSCのTERMINALウィンドウからpip installでインストールしたライブラリを有効にするにはVSCを再起動する必要があります。
エラーがないことを確認したらGPUの稼働状況を調べるためにWindows 11のタスクマネージャーを起動します。
タスクマネージャーはWindows 11の[スタート]から検索窓に「Task Manager」を入力して起動します。
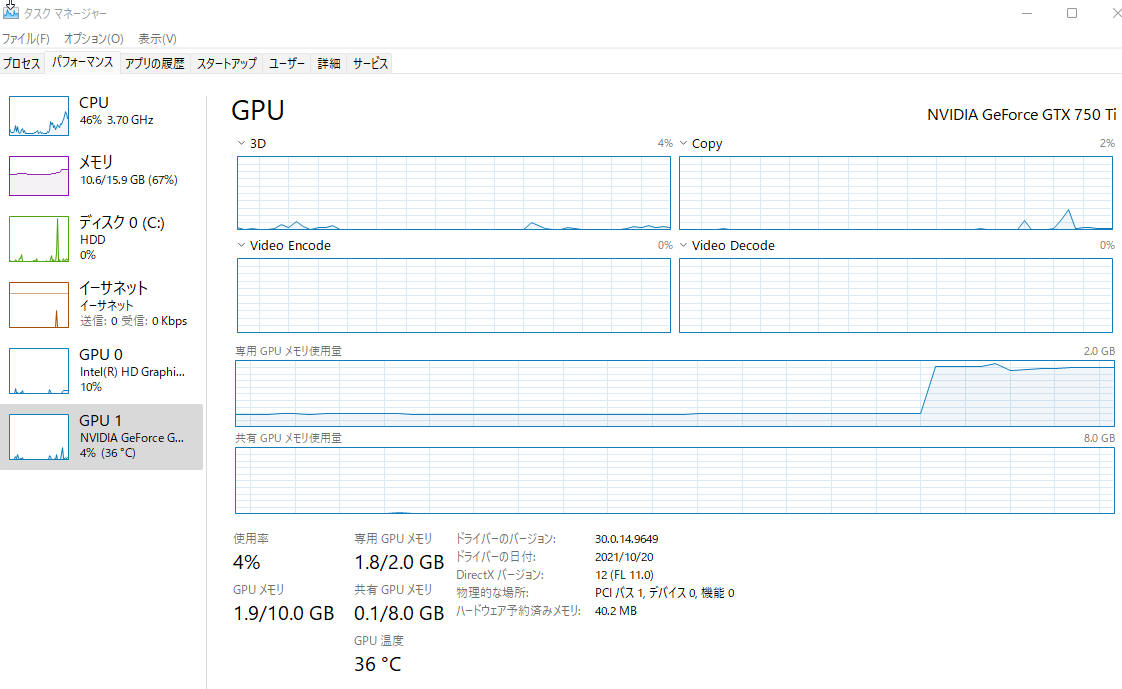
タスクマネージャーが起動したら「パフォーマンス」-「GPU 1」を選択します。
Visual Studio Codeから[▶]ボタンをクリックしてプログラムを実行します。
プログラムが実行されたらタスクマネージャーを監視してGPUの稼働状況を見ます。
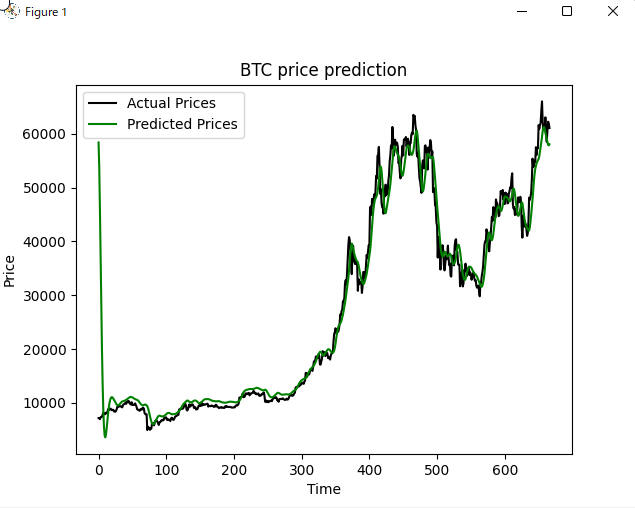
プログラムが終了すると最後に仮想通貨(暗号通貨)のグラフが表示されます。
ここに表示されている仮想通貨(暗号通貨)の実価格(Actual Prices)はPandasのDataReaderでYahoo!Financeから取得しています。
# TensorFlow Predicting Crypto Prices in Python.py
import os
os.environ['TF_CPP_MIN_LOG_LEVEL'] = '3'
# In detail:-
# 0 = all messages are logged (default behavior)
# 1 = INFO messages are not printed
# 2 = INFO and WARNING messages are not printed
# 3 = INFO, WARNING, and ERROR messages are not printed

import numpy as np              # pip install numpy or # pip install numpy==1.19.5
import matplotlib.pyplot as plt # pip install matplotlib
import pandas as pd             # pip install pandas
import pandas_datareader as web # pip install pandas-datareader
import datetime as dt

# pip install tensorflow
# pip install sklearn
# pip install scikit-learn

from sklearn.preprocessing import MinMaxScaler
from tensorflow.keras import models
from tensorflow.keras.layers import Dense, Dropout, LSTM
from tensorflow.keras.models import Sequential
from tensorflow.python.keras.backend import dropout

crypto_currency = 'BTC'
against_currency = 'USD'

start = dt.datetime(2016,1,1)
end = dt.datetime.now()

data = web.DataReader(f'{crypto_currency}-{against_currency}', 'yahoo', start, end)

# Prepare data

scaler = MinMaxScaler(feature_range=(0,1))
scaled_data = scaler.fit_transform(data['Close'].values.reshape(-1,1))

prediction_days = 60
x_train, y_train = [], []

for x in range(prediction_days, len(scaled_data)):
    x_train.append(scaled_data[x-prediction_days:x, 0])
    y_train.append(scaled_data[x, 0])

x_train, y_train = np.array(x_train), np.array(y_train)
x_train = np.reshape(x_train, (x_train.shape[0], x_train.shape[1], 1))

# Create Neural Network
# pip install numpy==1.19.5  # install numpy 1.19.5 if you get an error

model = Sequential()

model.add(LSTM(units=50, return_sequences=True, input_shape=(x_train.shape[1], 1)))
model.add(Dropout(0.2))
model.add(LSTM(units=50, return_sequences=True))
model.add(Dropout(0.2))
model.add(LSTM(units=50))
model.add(Dropout(0.2))
model.add(Dense(units=1))

model.compile(optimizer='adam', loss='mean_squared_error')
model.fit(x_train, y_train, epochs=25, batch_size=32)

# Testing model

test_start = dt.datetime(2020,1,1)
test_end = dt.datetime.now()

test_data = web.DataReader(f'{crypto_currency}-{against_currency}', 'yahoo', test_start, test_end)
actual_prices = test_data['Close'].values

total_dataset = pd.concat((data['Close'], test_data['Close']), axis=0)

model_inputs = total_dataset[len(total_dataset) - len(test_data) - prediction_days:].values
model_inputs = model_inputs.reshape(-1, 1)
model_inputs = scaler.fit_transform(model_inputs)

x_test = []

for x in range(prediction_days, len(model_inputs)):
    x_test.append(model_inputs[x-prediction_days:x, 0])

x_test = np.array(x_test)
x_test = np.reshape(x_test, (x_test.shape[0], x_test.shape[1], 1))

prediction_prices = model.predict(x_test)
prediction_prices = scaler.inverse_transform(prediction_prices)

plt.plot(actual_prices, color='black', label='Actual Prices')
plt.plot(prediction_prices, color='green', label='Predicted Prices')
plt.title(f'{crypto_currency} price prediction')
plt.xlabel('Time')
plt.ylabel('Price')
plt.legend(loc='upper left')
plt.show()
 図11-1
図11-1はVSCから[Exploere], [New File]をクリックしてテキストボックスにプログラムのファイル名を入力している画面です。
図11-1
図11-1はVSCから[Exploere], [New File]をクリックしてテキストボックスにプログラムのファイル名を入力している画面です。
 図11-2
図11-2はタスクマネージャーの「パフォーマンス」から「GPU 1」を選択している画面です。
プログラムを実行中にこの画面を見てGPUの利用状況を監視します。
図11-2
図11-2はタスクマネージャーの「パフォーマンス」から「GPU 1」を選択している画面です。
プログラムを実行中にこの画面を見てGPUの利用状況を監視します。
 図11-3
図11-3はプログラムが作成した仮想通貨(暗号通貨)(Bitcoin)のグラフです。
実価格はYahoo!Financeから取得しています。予測価格はプログラムが予測した価格です。
図11-3
図11-3はプログラムが作成した仮想通貨(暗号通貨)(Bitcoin)のグラフです。
実価格はYahoo!Financeから取得しています。予測価格はプログラムが予測した価格です。
 図11-4
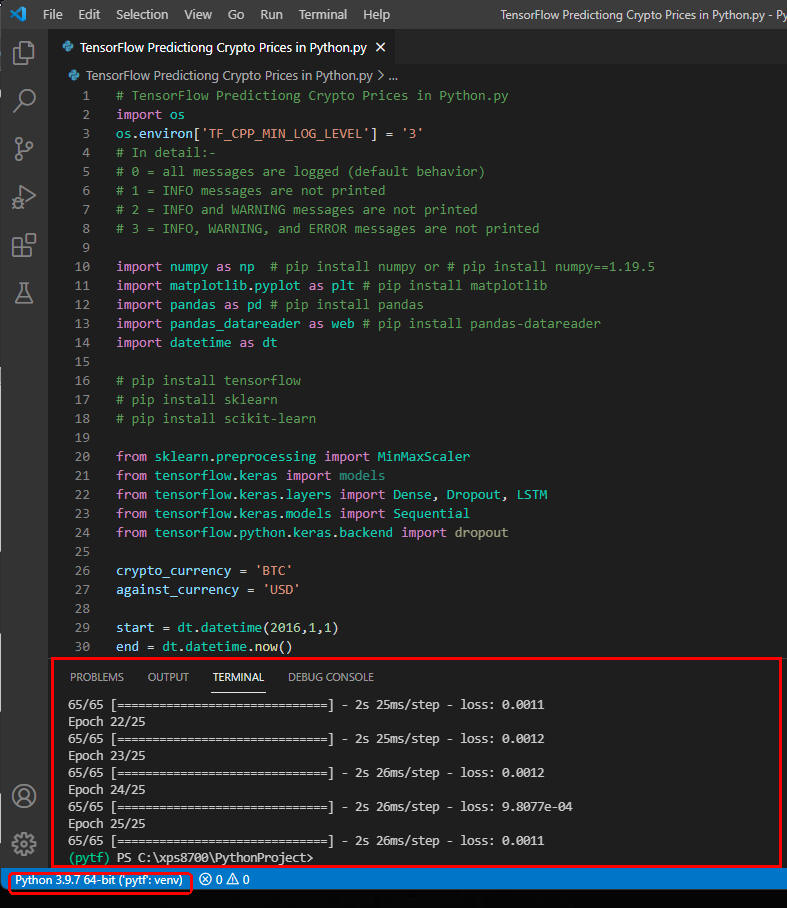
図11-4のVSCのTERMINALウィンドウの画面です。プログラムの実行結果が表示されています。
画面にEpoch 25/25のように表示されていますが、Epoch数は「ひとつの訓練データを何回繰り返して学習させるか」の回数のことです。
ここでは25と表示されているので25回繰り返して学習させたことになります。
ちなみに、未来の価格を予測するには以下のようなコードを追加します。
図11-4
図11-4のVSCのTERMINALウィンドウの画面です。プログラムの実行結果が表示されています。
画面にEpoch 25/25のように表示されていますが、Epoch数は「ひとつの訓練データを何回繰り返して学習させるか」の回数のことです。
ここでは25と表示されているので25回繰り返して学習させたことになります。
ちなみに、未来の価格を予測するには以下のようなコードを追加します。
# Predict Next day

real_data = [model_inputs[len(model_inputs) + 1 - prediction_days:len(model_inputs) + 1, 0]]
real_data = np.array(real_data)
real_data = np.reshape(real_data, (real_data.shape[0], real_data.shape[1], 1))

prediction = model.predict(real_data)
prediction = scaler.inverse_transform(prediction)

print(prediction)