Windows 11に64-bit版のPyodbcをインストールするには [Python 64-bit, Pyodbc 64-bit]
このシリーズではWindows 11にPythonの異なる開発環境(32-bit/64-bit)を用意するための手順を解説します。
Pythonの複数の開発環境を用意するシリーズは、次の5つの記事から構成されています。
シリーズの第5回目では、Windows 11に「64-bit版のPython 3.10.6」と「64-bit版のPyodbc」の開発環境を用意する手順を解説します。
ここでは最初に64-bit版のPython 3.10.6の仮想環境を作成します。次にこの仮想環境に64-bit版のPyodbcをインストールします。
最後にPyodbcを使用してMS-Accessのデータベースを処理する方法についても解説します。
説明文の左側に図の画像が表示されていますが縮小されています。
画像を拡大するにはマウスを画像上に移動してクリックします。
画像が拡大表示されます。拡大された画像を閉じるには右上の[X]をクリックします。
画像の任意の場所をクリックして閉じることもできます。
 図A:
図A:
 図B:
図B:
 図C:
図C:
 図D:
図D:
 図E:
図E:
Python 3.10.6 64-bitの開発環境に64-bitのPyodbcをインストールする
-
Python 3.10.6の64-bitの仮想環境を作成する
まずは、Python 3.10.6の64-bitの仮想環境を作成します。
ここで使用する仮想環境の作成手順については「記事(Article096)」で詳しく解説しています。
ここでは「記事(Article096)」の手順1~10までの作業が完了したものとして説明します。
import sys
import platform

def get_info(id: int) -> str:
    match id:
        case 1:
            return '🌺 Python'
        case 2:
            return f'🌻 Python {platform.python_version()} '
        case 3:
            is64Bit = sys.maxsize > 2 ** 32
            bit = '64-Bit' if is64Bit else '32-Bit'
            return f'😅 Python {platform.python_version()} {bit}'
        case _:
            return '🐍 Hello, World!'


if __name__ == '__main__':
    print(get_info(0))
    print(get_info(1))
    print(get_info(2))
    print(get_info(3))
 図1
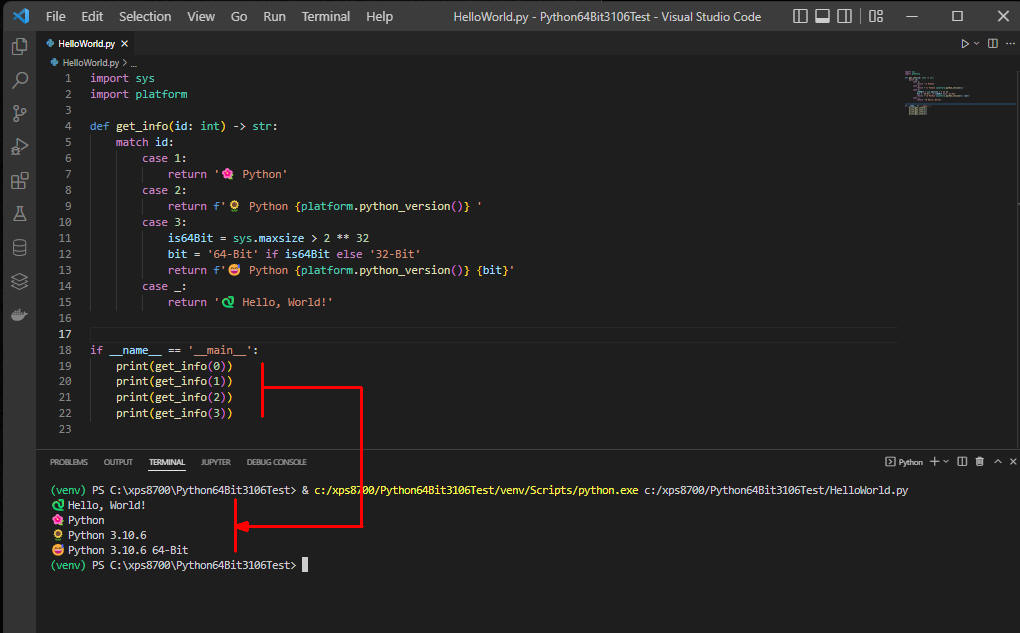
図1はPython 3.10.6 64-bit版の仮想環境で「HelloWorld.py」プログラムを実行しています。
実行結果に「Python 3.10.6 64-Bit」が表示されているのでVisual Studio Code(VSC)に正しい仮想環境が設定されていることが確認できました。
図1
図1はPython 3.10.6 64-bit版の仮想環境で「HelloWorld.py」プログラムを実行しています。
実行結果に「Python 3.10.6 64-Bit」が表示されているのでVisual Studio Code(VSC)に正しい仮想環境が設定されていることが確認できました。
-
Windowsの64-bit版のPyodbcのパッケージをダウンロードする
Chris Gholksさんの
「Webサイト」
に移動したらWindowsの64-bitのPyodbcのパッケージをダウンロードします。
PyodbcのパッケージはPythonのバージョン毎に用意されているので、ここではPython 3.10.xのパッケージをダウンロードします。
pyodbc‑4.0.32‑cp310‑cp310‑win_amd64.whl # Python 3.10.x Version
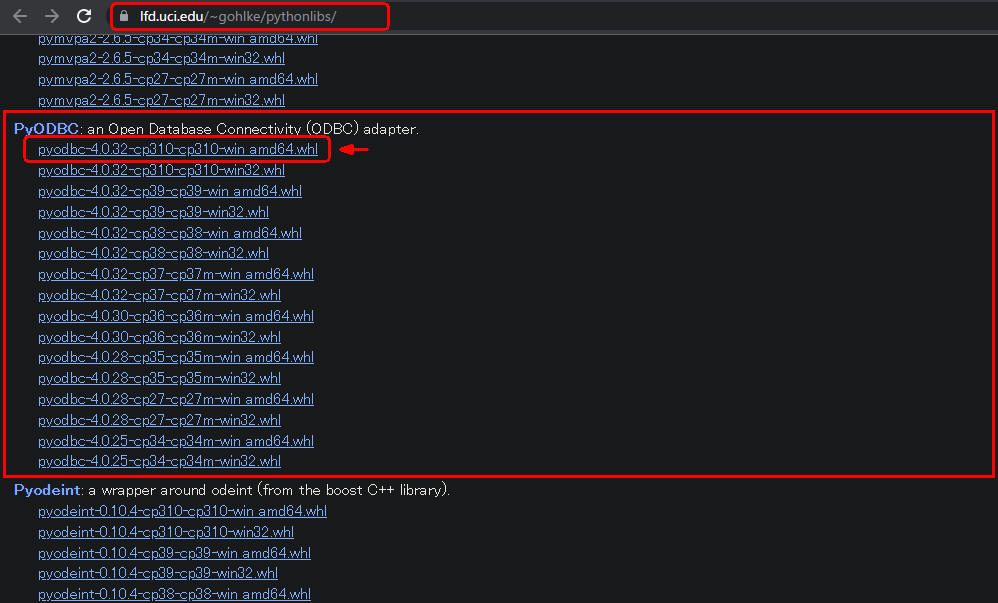 図2-1
PyODBCの一覧から64-bitのpyodbc(Python 3.10.x)のパッケージをダウンロードします。
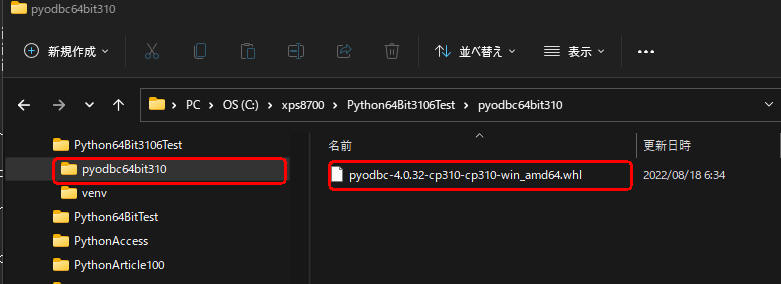 図2-2
Pythonのプロジェクトフォルダ「Python643106Test」にサブフォルダ「pyodbc64bit310」を作成したら、
このフォルダに64-bitのPyodbc(3.10.x)のパッケージを移動します。
-
64-bitのPyodbc(3.10.x)をインストールする
pip list
pip install wheel
pip install C:\xps8700\Python64Bit3106Test\pyodbc64bit310\pyodbc-4.0.32-cp310-cp310-win_amd64.whl
 図3
Visual Studio Code(VSC)のTERMINALウィンドウから行1の「pip list」を入力してPythonのライブラリの一覧を表示します。
「wheel」がインストールされていないときは行2の「pip install wheel」を入力して実行します。
最後に行3の「pip install ...」を入力して64-bitのPyodbcをインストールします。
オレンジの箇所は各自の環境に合わせて書き換えてください。
-
64-bit版のPyodbcでAccessのデータベースに接続する
Visual Studio Code(VSC)から新規ファイル「Access_Connect.py」を作成して行1-16を入力(コピペ)して実行します。
行1では64-bit版のPyodbcのライブラリを取り込んでいます。
行3-6ではPyodbcがサポートしているAccessドライバーの一覧を表示しています。
行7-10ではAccessのデータベース「Stats.accdb」のフルパスを定義しています。
行11-16では「Stats.accdb」データベースに登録されているテーブルの一覧を表示しています。
なお、64-bit版のPyodbcを使用するときは、
64-bit版の「Microsoft Access データベース エンジン 20XX 再頒布可能コンポーネント」が必要になりますので、
事前にダウンロードしてインストールしておいてください。
import pyodbc as pyo
#print(pyo.drivers())
for driver in pyo.drivers():
    if driver.startswith('Microsoft Access Driver'):
        print(driver)
print('-'*50)
con_str = (
	r'Driver={Microsoft Access Driver (*.mdb, *.accdb)};'
	r'DBQ=C:\xps8700\Python64Bit3106Test\db\Stats.accdb;'
	)
con = pyo.connect(con_str)
cursor = con.cursor()
for table in cursor.tables(tableType='TABLE'):
    print(table.table_name)
cursor.close()
con.close()
 図4
図4ではPyodbcのAccessのドライバーの一覧を表示しています。
さらにAccessのデータベース「Stats.accdb」に登録されているテーブルの一覧も表示しています。
ここでは「Category, Stats」のテーブル名が表示されています。
図4
図4ではPyodbcのAccessのドライバーの一覧を表示しています。
さらにAccessのデータベース「Stats.accdb」に登録されているテーブルの一覧も表示しています。
ここでは「Category, Stats」のテーブル名が表示されています。
-
Accessのテーブルからレコードを抽出する
Visual Studio Code(VSC)から新規ファイル「Access_Select.py」を作成したら行1-40を入力(コピペ)します。
行1では64-bitのPyodbcのライブラリを取り込んでいます。
行3-32ではCategoryのクラスを定義しています。
行4-7ではCategoryのインスタンス・メソッド「__init__()」を定義しています。
このメソッドはCategoryのインスタンスを生成したときに自動的に呼ばれます。
行9-10ではCategoryのインスタンス・メソッド「__str__()」を定義しています。
このメソッドはstr(), print()からCategoryのオブジェクトを参照したときに自動的に呼ばれます。
インスタンス・メソッドはCategoryクラスのインスタンスを生成してから呼び出す必要があります。
行12-18ではCategoryのスタティック・メソッド「get_str()」を定義しています。
行20-32ではCategoryのクラス・メソッド「fetch_all()」を定義しています。
スタティック・メソッドとクラス・メソッドはCategoryのインスタンスを生成することなく呼び出すことができます。
行34-37では関数「main()」を定義しています。
行35ではCategoryクラスのクラス・メソッド「fetch_all()」を呼び出しています。
行36-37では変数categoriesに格納されているCategoryオブジェクトの内容を表示しています。
行39-40では関数「main()」を呼び出しています。
import pyodbc as pyo

class Category:
    def __init__(self, id: int, category_name: str, date_added: str):
        self.id = id
        self.category_name = category_name
        self.date_added = date_added

    def __str__(self) -> str:
        return f"ID={self.id}, Category Name={self.category_name}, Date Added={self.date_added}"

    @staticmethod
    def get_str() -> str:
        con_str = (
            r'Driver={Microsoft Access Driver (*.mdb, *.accdb)};'
            r'DBQ=C:\xps8700\Python64Bit3106Test\db\Stats.accdb;'
            )
        return con_str

    @classmethod
    def fetch_all(cls) -> list:
        con = pyo.connect(Category.get_str())
        cursor = con.cursor()
        sql = 'SELECT * FROM Category'
        rows = cursor.execute(sql).fetchall()
        categories = []
        for row in rows:
            category = cls(row.ID, row.CategoryName, row.DateAdded.strftime("%Y/%m/%d"))
            categories.append(category)
        cursor.close()
        con.close()
        return categories

def main():
    categories = Category.fetch_all()
    for category in categories:
        print(category)

if __name__ == '__main__':
    main()
 図5
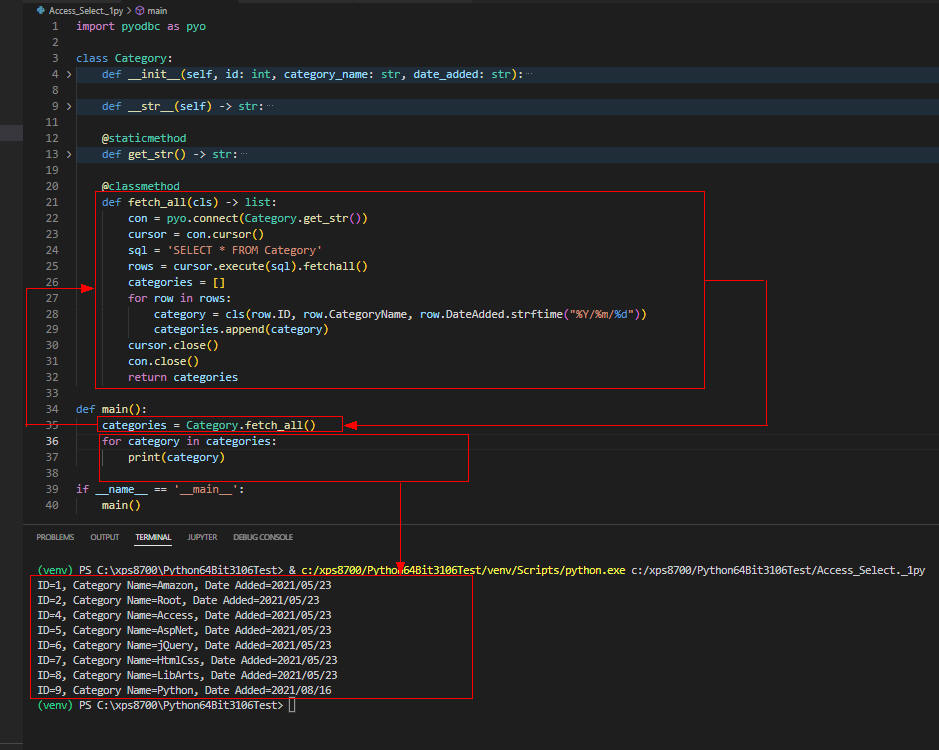
図5には「Category」テーブルの全てのレコードが表示されています。
図5
図5には「Category」テーブルの全てのレコードが表示されています。
TIP1: 「@staticmethod」の代わりに「class variable」を使う方法もあります。
行4-7ではAccessデータベースの接続文字列を定義しています。
Pythonで定数を定義するときは通常変数名を大文字「CONNECT_STRING」にします。
行19のPyodbcのconnect()メソッドでは引数に「class variable」を指定しています。
import pyodbc as pyo

class Category:
    CONNECT_STRING = (
            r'Driver={Microsoft Access Driver (*.mdb, *.accdb)};'
            r'DBQ=C:\xps8700\Python64Bit3106Test\db\Stats.accdb;'
        )

    def __init__(self, id: int, category_name: str, date_added: str):
        self.id = id
        self.category_name = category_name
        self.date_added = date_added

    def __str__(self) -> str:
        return f"ID={self.id}, Category Name={self.category_name}, Date Added={self.date_added}"

    @classmethod
    def fetch_all(cls) -> list:
        con = pyo.connect(Category.CONNECT_STRING)
        cursor = con.cursor()
        sql = 'SELECT * FROM Category'
        rows = cursor.execute(sql).fetchall()
        categories = []
        for row in rows:
            category = cls(row.ID, row.CategoryName, row.DateAdded.strftime("%Y/%m/%d"))
            categories.append(category)
        cursor.close()
        con.close()
        return categories

def main():
    categories = Category.fetch_all()
    for category in categories:
        print(category)

if __name__ == '__main__':
    main()
-
Pythonの「requirements.txt」ファイルを再作成する
pip freeze >requirements.txt
pip freeze
 図6
図6ではVisual Studio Code(VSC)から行1の「pip freeze ...」を入力して「requirements.txt」ファイルを再作成しています。
64-bitのPyodbcはローカルのフォルダ「pyodbc64bit310」からインストールされます。
図6
図6ではVisual Studio Code(VSC)から行1の「pip freeze ...」を入力して「requirements.txt」ファイルを再作成しています。
64-bitのPyodbcはローカルのフォルダ「pyodbc64bit310」からインストールされます。